Sync from Dyad's Nexsure to Insuredmine
Simplify the process by displaying all client information, contacts, and policies in organized tabs within Dyad’s Nexsure upon syncing with InsuredMine. Additional actions like syncing tasks, notes, SMS, and activities from InsuredMine to Dyad’s Nexsure will sync under the “Action” tab. Moreover, files, eSignatures, and emails stored in InsuredMine will seamlessly sync under the “Attachment” tab within Dyad’s Nexsure.
Daily AMS sync option from Dyad’s Nexure to InsuredMine
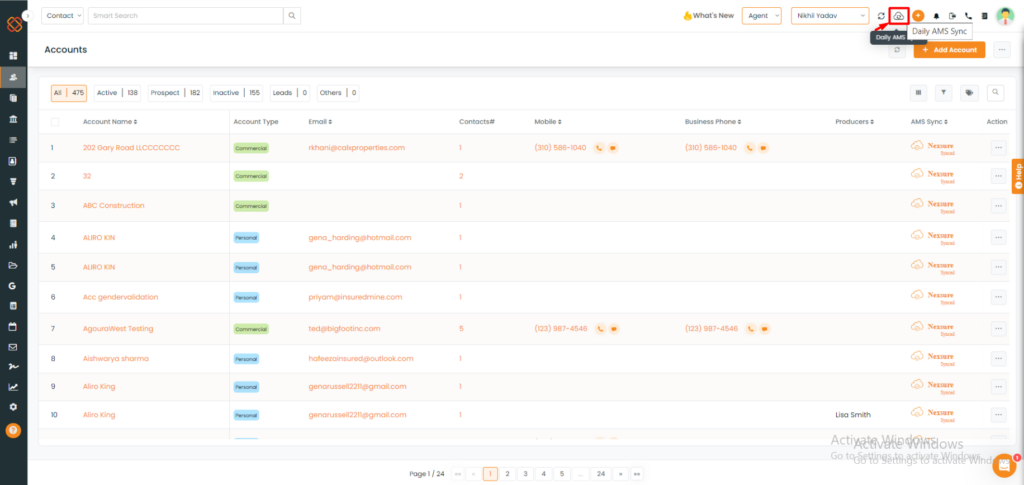
Please note: The daily synchronization option operates automatically twice a day, ensuring the transfer of data from Dyad’s Nexsure to InsuredMine without the need for manual intervention.
Single Account Refresh:
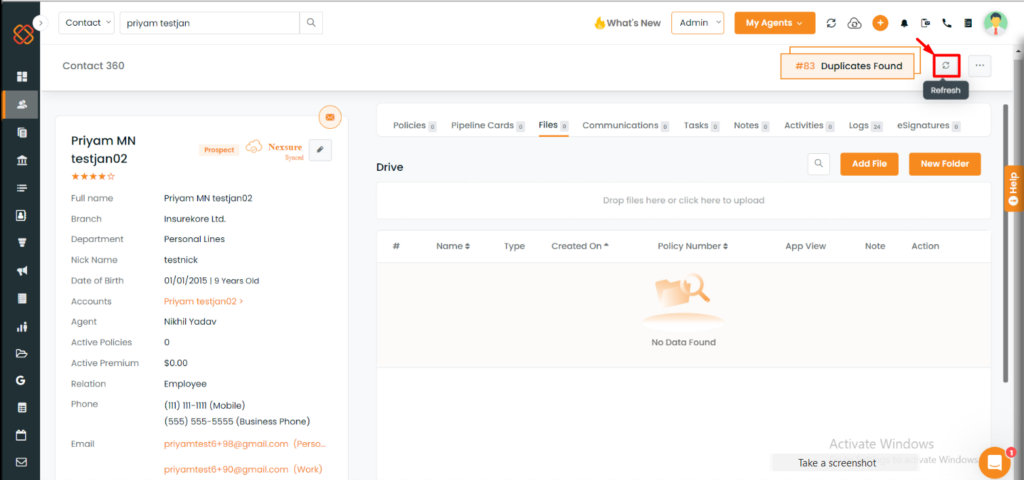
Upon clicking the single account refresh option, all data pertaining to the specified account, including contacts, policies, accounts, and activities, will sync from Dyad’s Nexsure to InsuredMine.
Fields synced under Accounts between Dyad's Nexsure and InsuredMine
Accounts
Both Personal and Commercial account types are synced with InsuredMine. The following fields are synced under Accounts from Dyad’s Nexsure to InsuredMine:
- Client Name
- Client type (Personal/Commercial)
- Status (Client/Prospect)
- Phone
- Address
- Branch
- Department
- Agent (if responsibility is Producer)
- CSR (if responsibility is Account Manager)
Including Client Type in Dyad's Nexsure
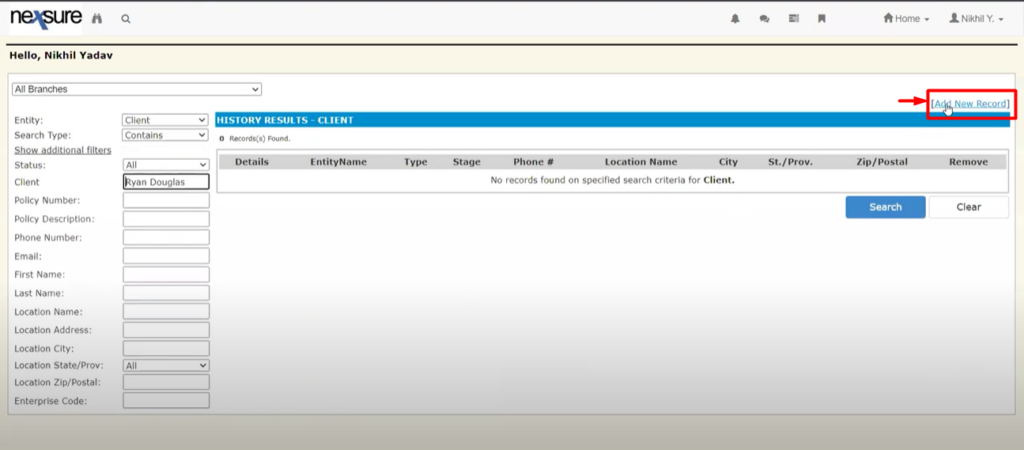
- In Dyad’s Nexsure, select “Add new Record.”

- Complete the required client details and Primary Account Address.

Note: The client information entered in Dyad’s Nexsure utilizes the designated data field labeled “Client Name” within the Dyad’s Nexsure platform.
Fields synced under Contacts between Dyad's Nexsure and InsuredMine
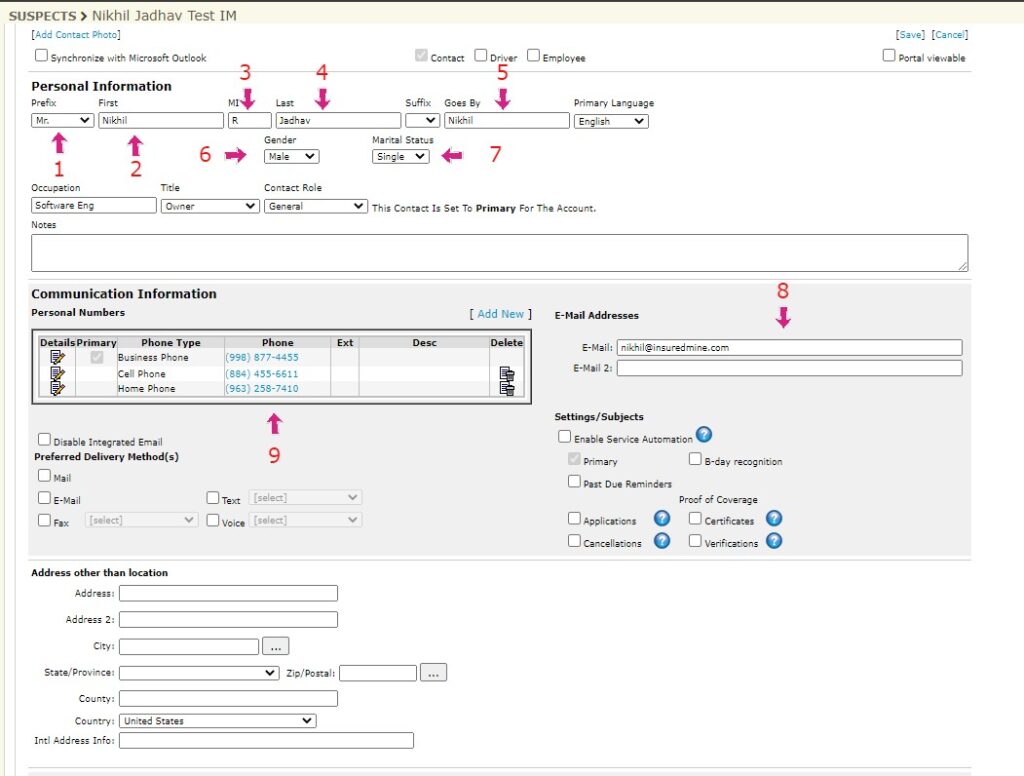
The following fields are synced under Contacts from Dyad’s Nexsure to InsuredMine:
- Prefix
- First name
- Middle name
- Last name
- Nickname
- Gender
- Marital status
- Phone number
Add a contact in Dyad’s Nexsure:
Complete the required client details.
Fields synchronized under Policy between Dyad's Nexsure and InsuredMine
The following fields are synced under Policy from Dyad’s Nexsure to InsuredMine:
- Policy number
- Policy start date
- Policy end date
- Issuing carrier/Billing carrier
- Policy mode
- Policy status
- Lines of Business

Syncing Contacts from InsuredMine to Dyad's Nexsure
Contacts
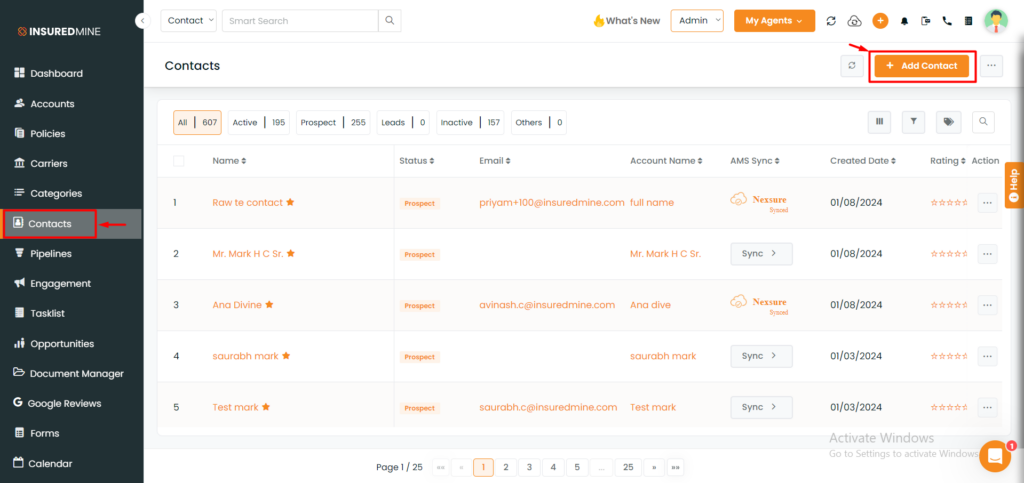
- Access Contacts from the sidebar and select “Add Contact.”
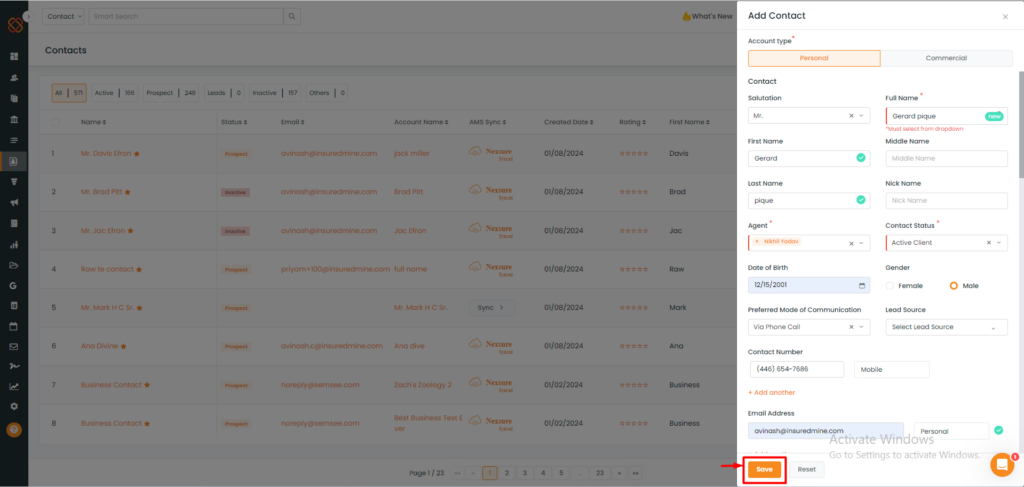
- A window will prompt from the right, requesting all mandatory details to be filled in.
- Click “Save” to proceed, thus creating your new contact.
Now, users have the option to manually sync a contact from InsuredMine to Dyad’s Nexsure by directly clicking on the AMS Sync option.
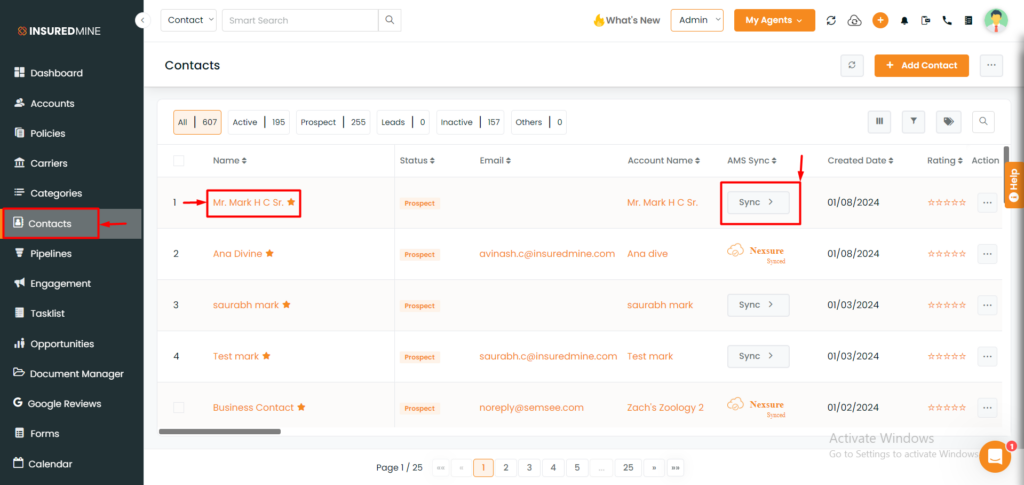
- Navigate to Contacts.
- Choose the desired contact for sync.
- Click on the “Sync.”
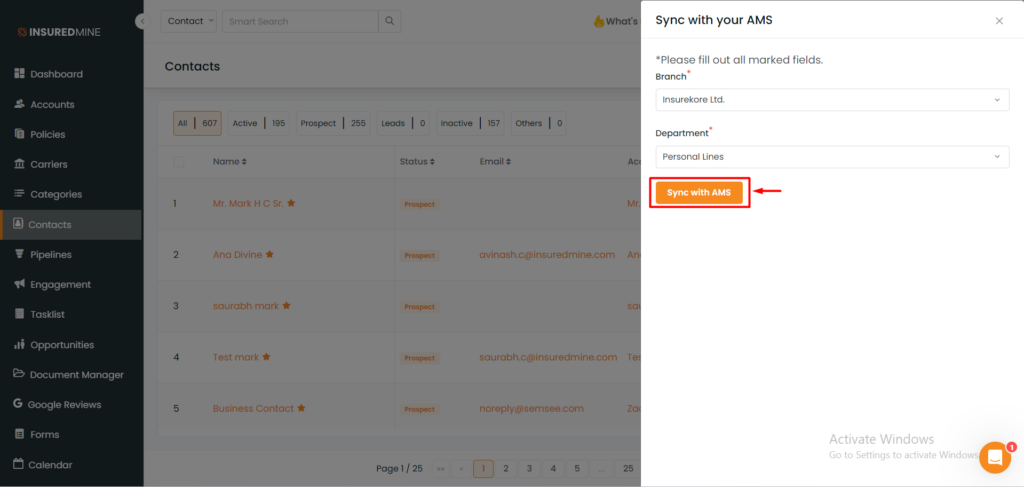
- A minimized window will appear from the right side.
- Complete the required fields, such as Branch and Department, as indicated.
- Click on “Sync with AMS.”
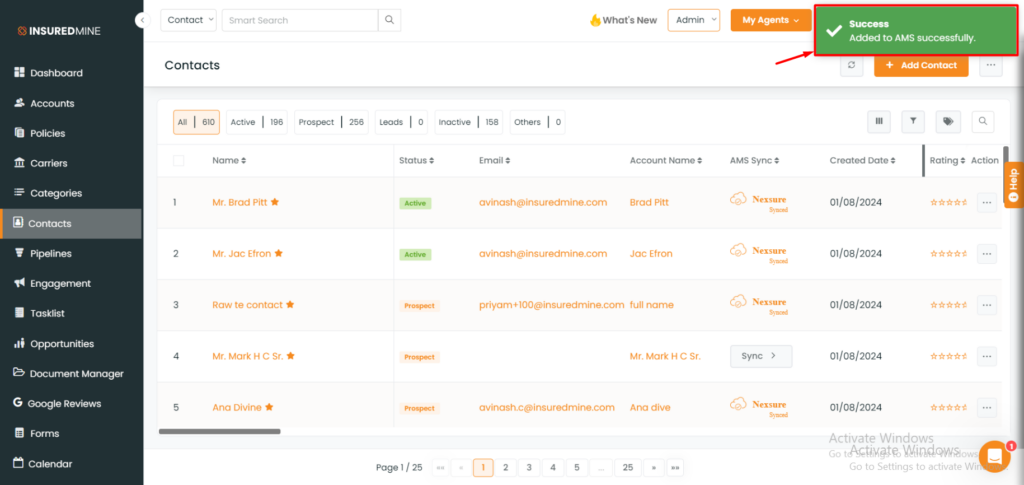
- A success message will appear displaying, “Added to AMS successfully.”
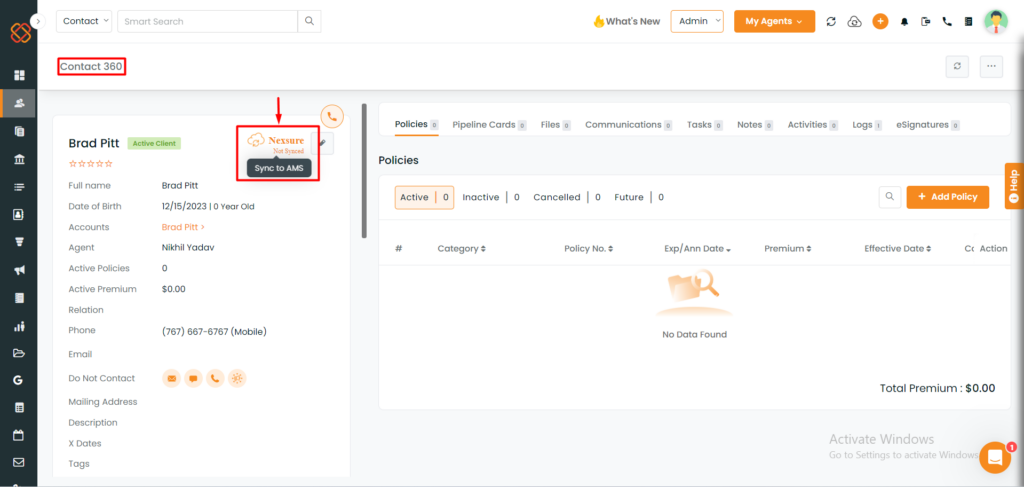
- Users can sync a contact from InsuredMine to Dyad’s Nexsure directly from Contact 360. If the contact is not yet synced, simply click on “Not Synced” to initiate the sync with AMS.
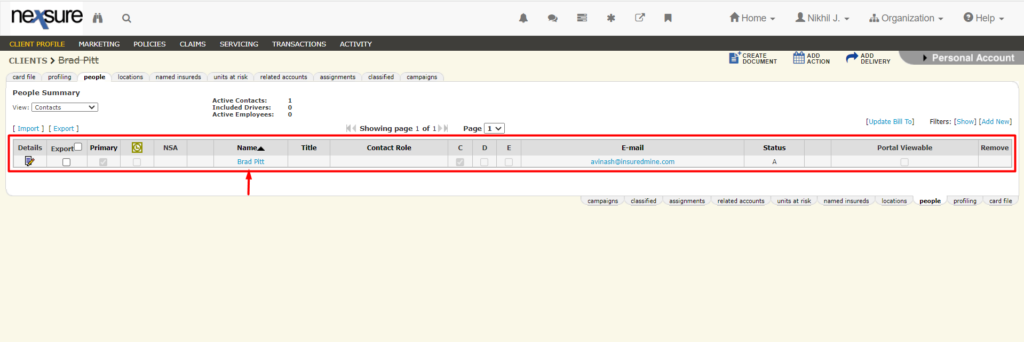
Note: The contact data can be viewed within Dyad’s Nexsure upon successful sync.
Syncing Accounts from InsuredMine to Dyad's Nexsure
Accounts
Note: To sync account details from InsuredMine to Dyad’s Nexsure, ensure that the contact is present within the respective account and has valid address details; otherwise, the sync will not occur.
Adding an Account in InsuredMine:
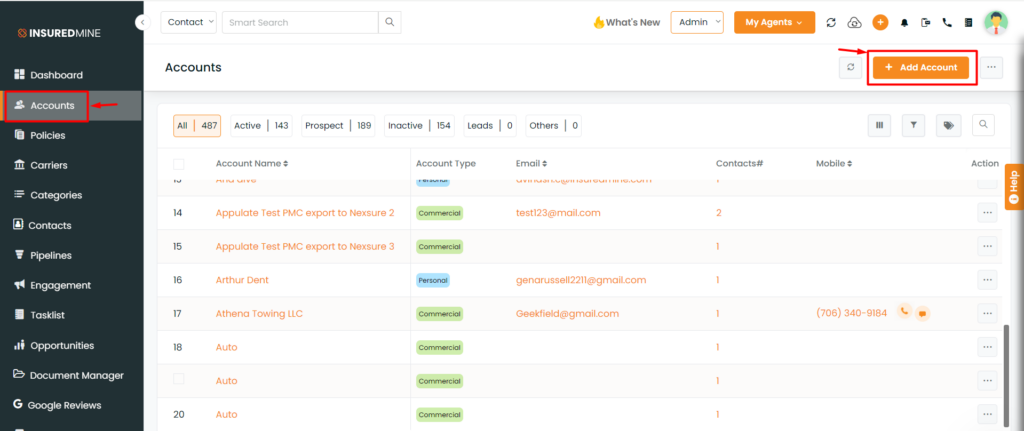
- Navigate to Accounts from the sidebar and click on “Add Account“.
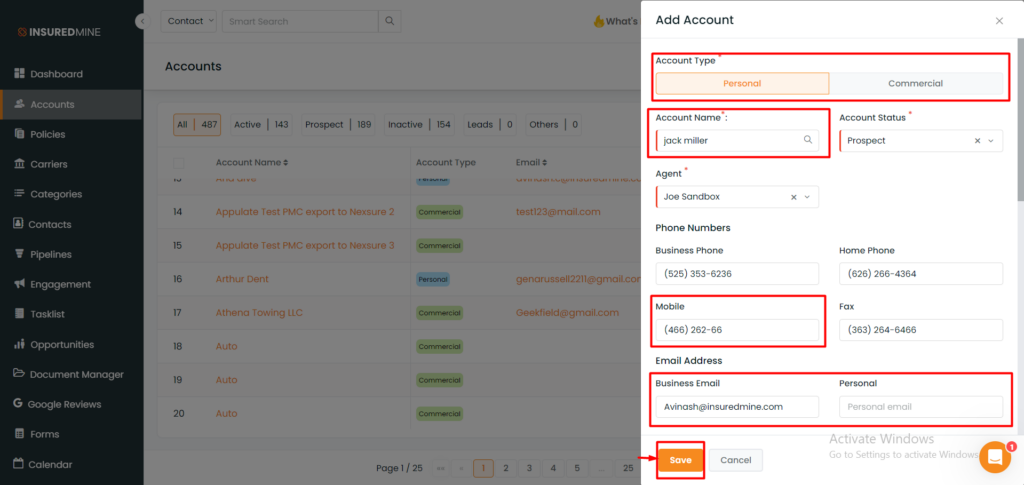
- A window will open from the right, prompting users to fill in all required details.
- Once complete, click on “Save” to create the account.
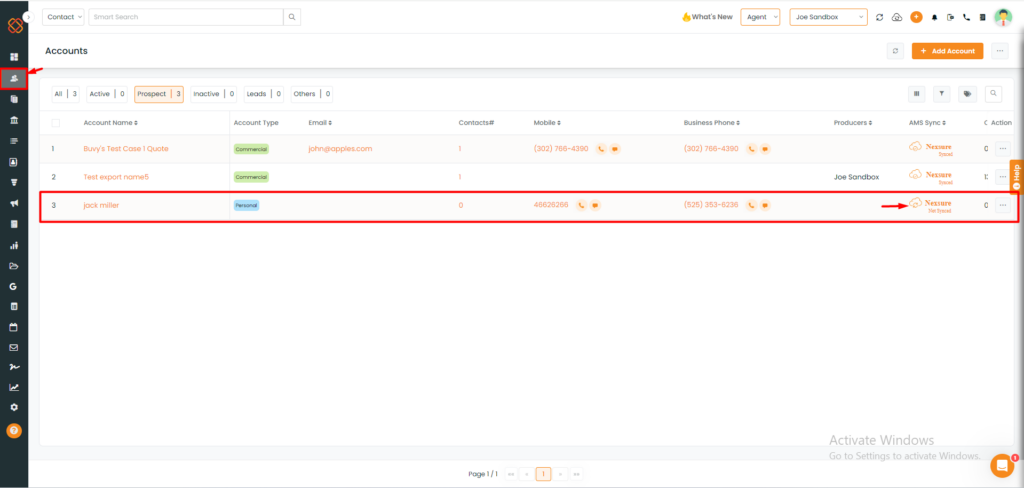
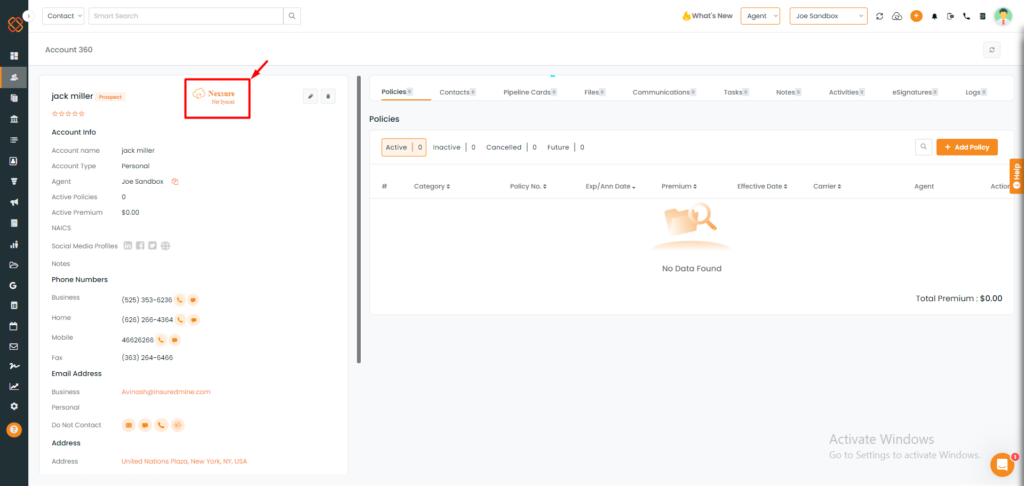
- Users can manually sync an account from InsuredMine to Dyad’s Nexsure directly from Contact 360. If the account is not yet synced, simply click on “Not Synced” to initiate the sync with AMS.
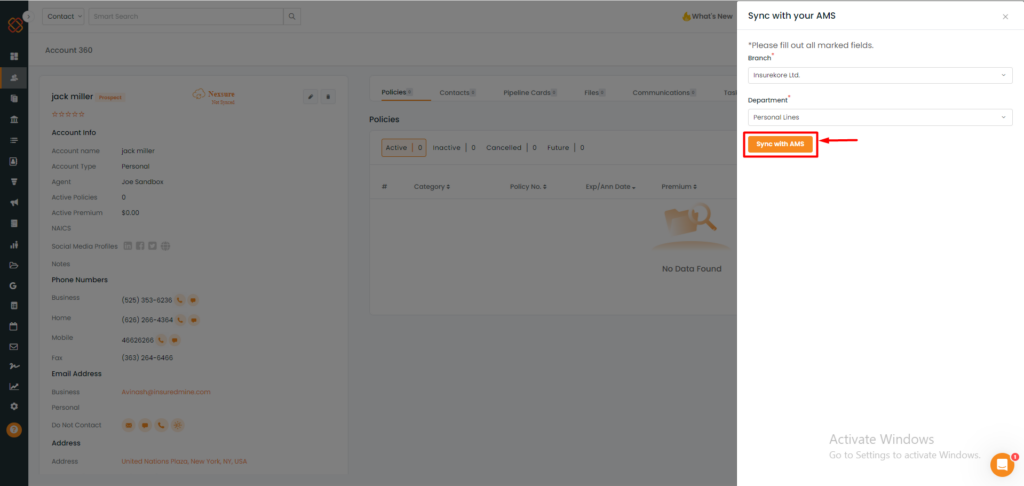
- A minimized window will appear from the right side.
- Complete the required fields, such as Branch and Department, as indicated.
- Click on “Sync with AMS.”
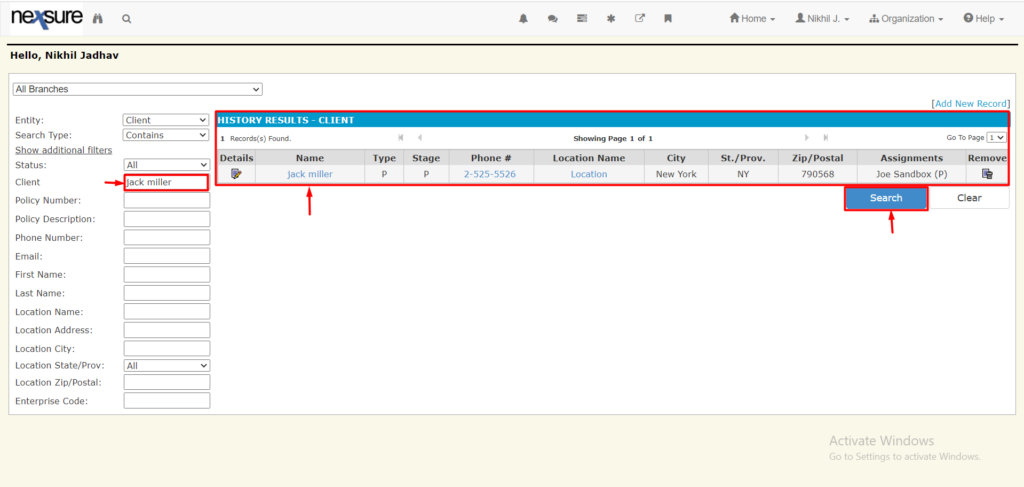
Note: The account data can be viewed within Dyad’s Nexsure upon successful sync.
Syncing Policies from InsuredMine to Dyad's Nexsure
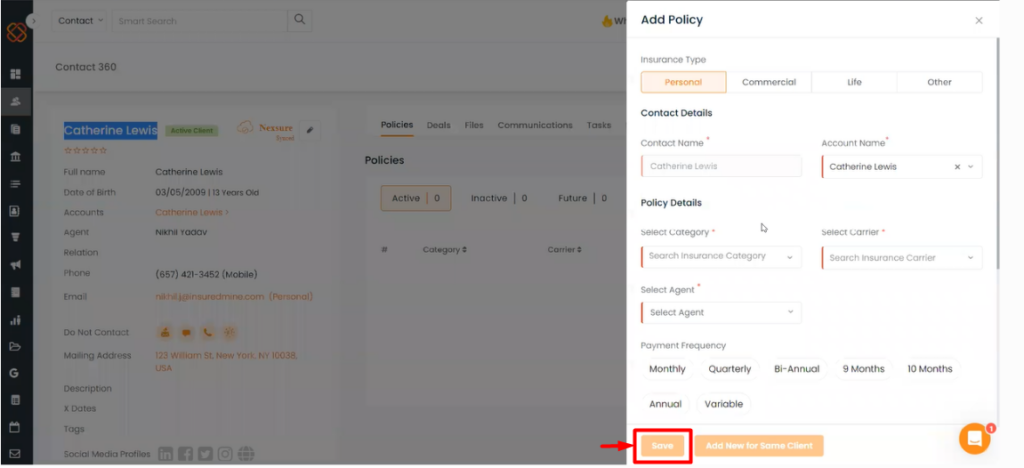
- Fill in all the necessary details and then click on “Save.”
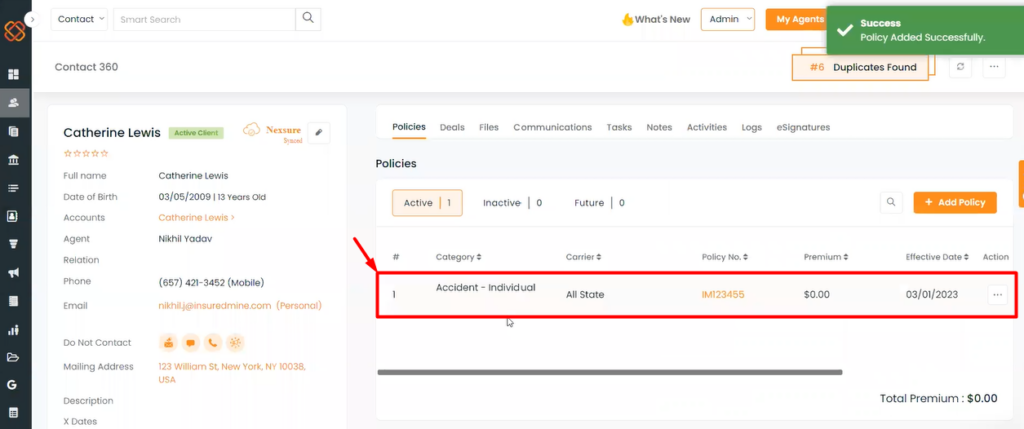
- Upon successful submission, a message will appear displaying, “Policy Added successfully.”
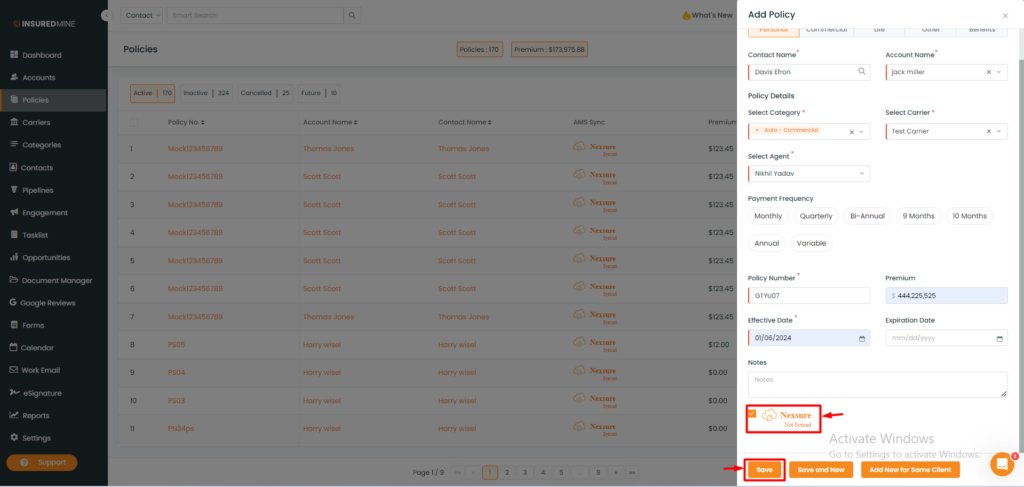
- While entering the policy details, users have the option to select the “Nexsure Not Synced” option, enabling direct sync from InsuredMine to Dyad’s Nexsure.
Alternatively, users have the option to manually sync from the policies module.
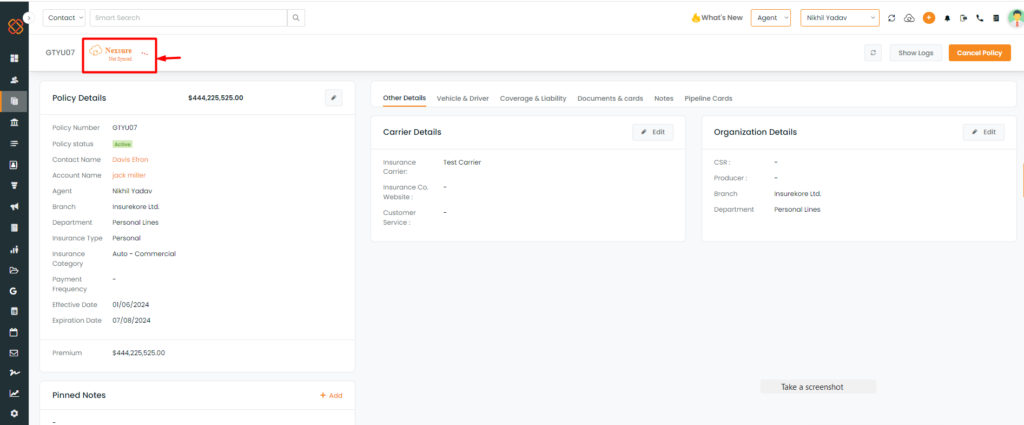
- Select the desired Policy for sync.
- Navigate to the policy details page.
- Locate and click on the option labeled “Nexsure not synced.”
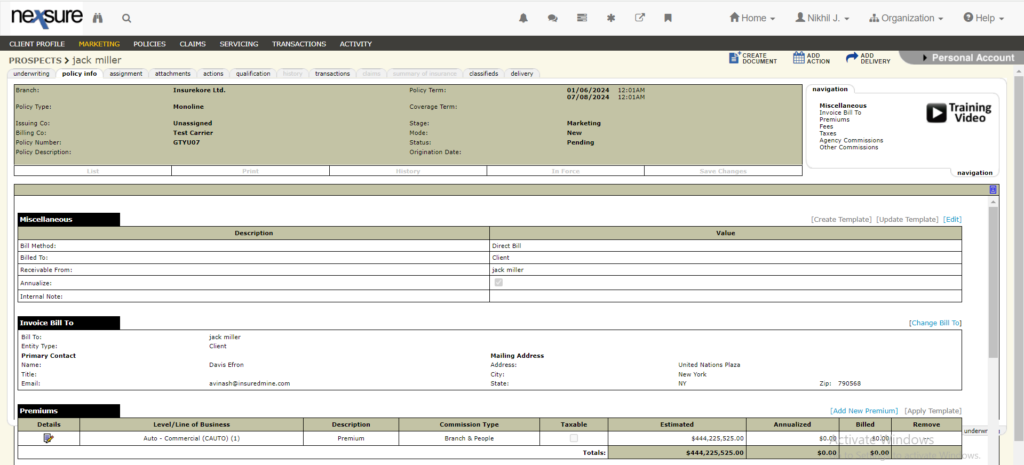
Note: You can view the policy data within Nexsure after a successful sync.
Auto /Manual sync setting for contact and policy
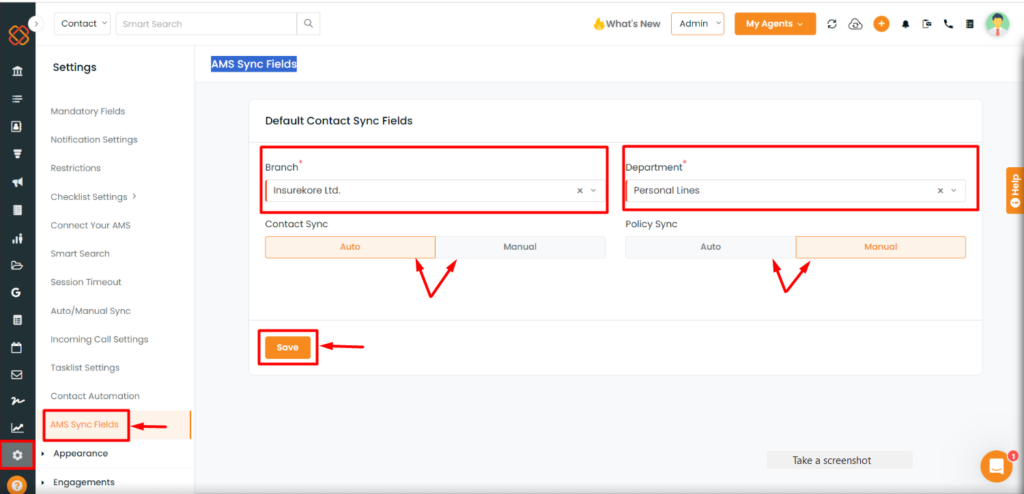
Users have the option to select manual or automatic synchronization for contact and policy information to Nexsure from the settings module.
- Navigate to the Settings module.
- Click on AMS Sync Fields.
- Default select the branch and department for Contact and Policy sync.
- Click on manual or automatic sync.
- Click Save.
Restrict Manual or Auto Sync for activities from InsuredMine to Dyad's Nexsure
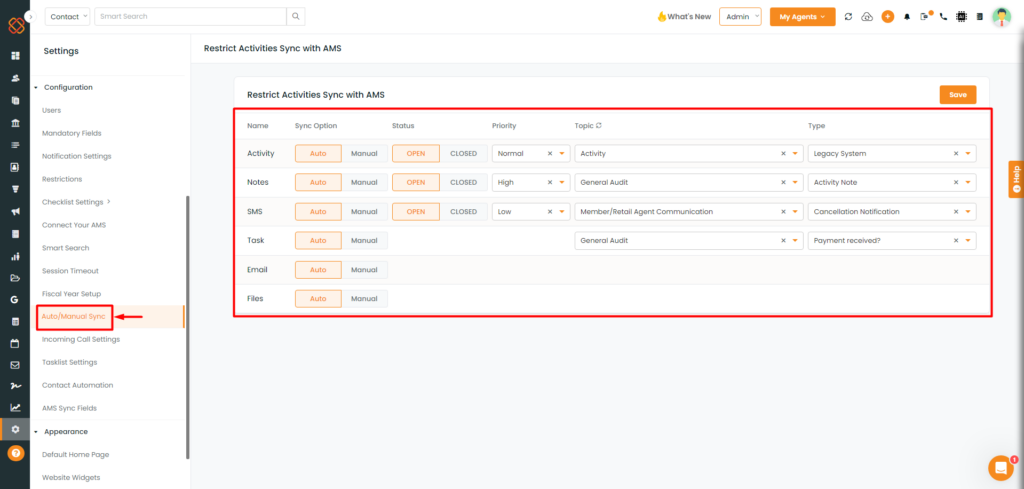
- In the settings module of InsuredMine, there is an option known as Auto/Manual Sync. Users have the ability to control the synchronization method, whether it’s set to auto or manual, for activities such as email, files, notes, SMS, tasks, and activities that sync with Dyad’s Nexsure.
Activities Sync from Dyad's Nexsure to InsuredMine
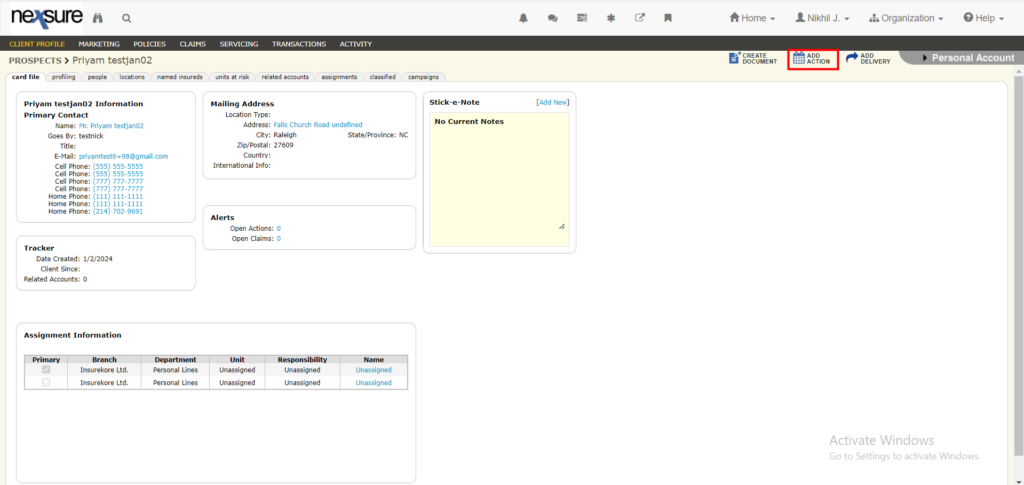
- Click on “Add Action.”
To sync activities from Dyad’s Nexsure to InsuredMine (Activities are portrayed as “Action” in Dyad’s Nexsure):
Note: All actions performed within Dyad’s Nexsure will be synced into tasks in InsuredMine.
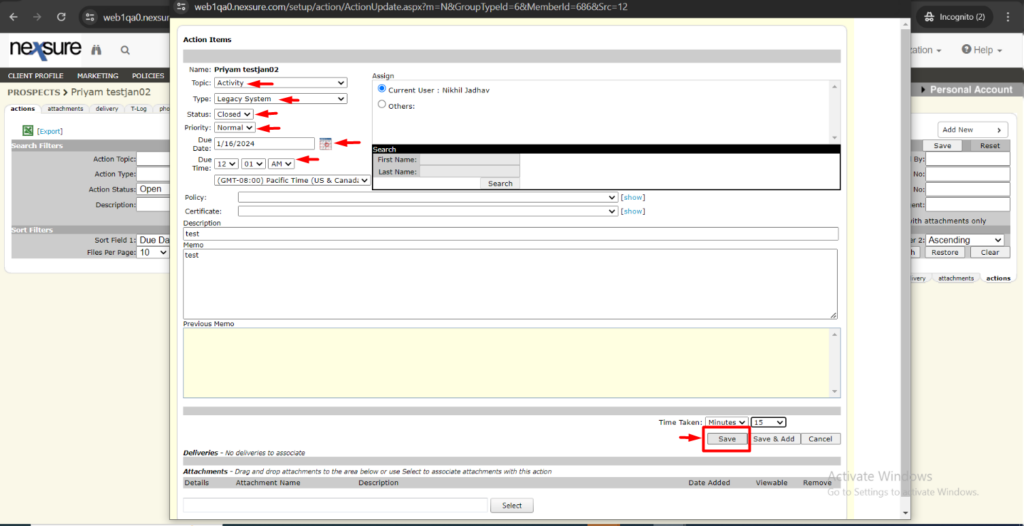
- Fill in the required details for successful sync to InsuredMine.
- Then, click “Save.”
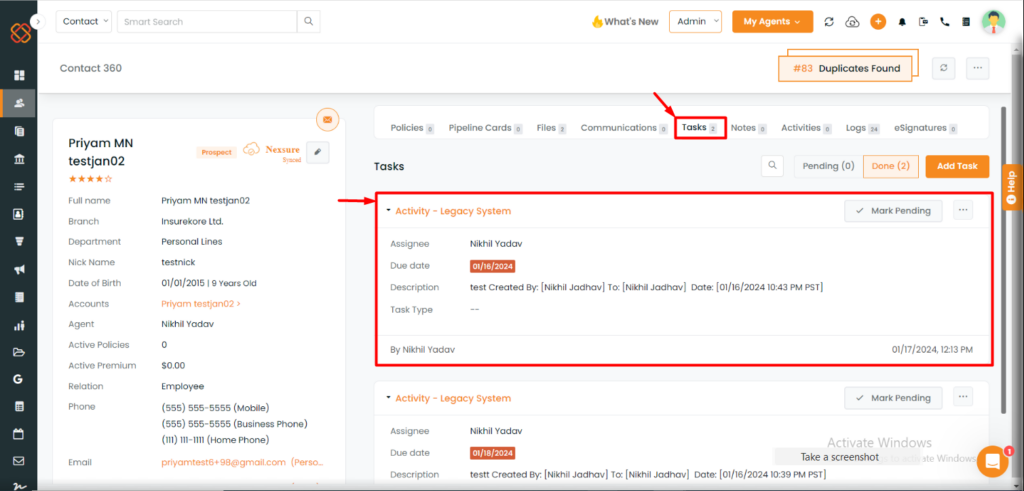
- Users can access their synced data within InsuredMine under the ‘Task’ section of the account.
All Files, eSignatures, and Emails from InsuredMine Synced to the Attachment Section in Dyad's Nexsure
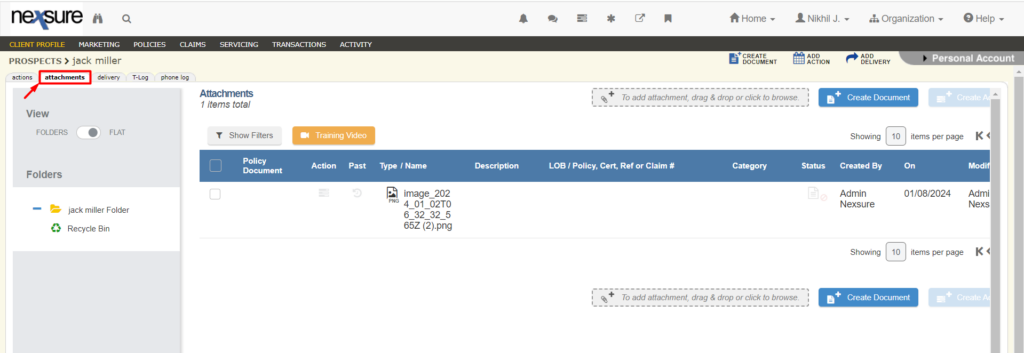
Note: Users can access files, e-signatures, and emails synced from InsuredMine under the attachments section within Dyad’s Nexsure.
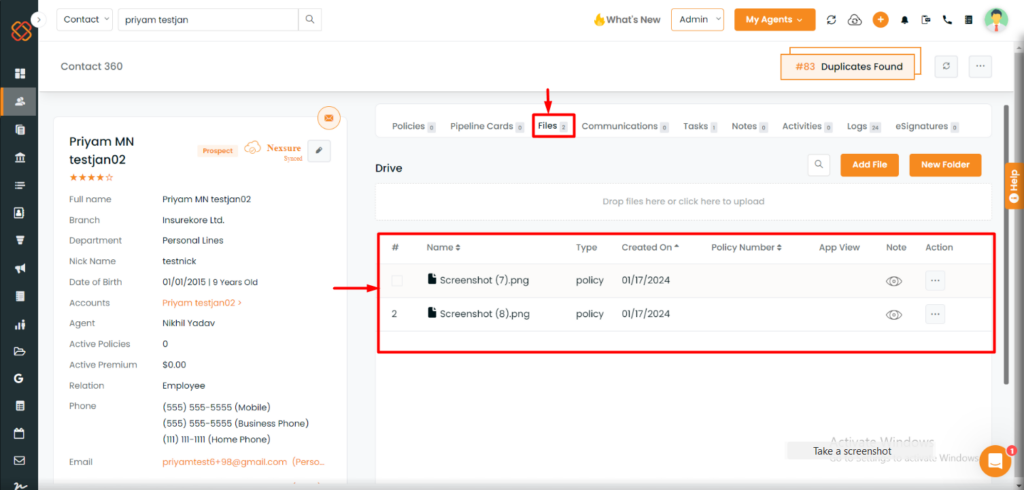
Within InsuredMine, users can view the attachments synced from Dyad’s Nexsure within the Files section.

Note: Users can access their Tasks, Notes, SMS, and Activities under the “Actions” section within Nexsure.


