How to start a Drip Campaign?
A drip email campaign is one of the flagship product features of our Agency Portal and we are continuing to enhance the capability of this tool. It is a powerful tool in the hands of an agent so the agent can be on top of engagement with their prospects and clients, as well as increase operational efficiency, and save time for other important things.
With our latest release you can do the following:
- Drip campaign will allow you to add Unlimited stages (i.e. multiple individual emails) that create a series of emails.
- Emails can be scheduled for specific dates and times, a certain number of days after the first email was sent, or they can be sent immediately.
Steps to start a campaign
Smart communication is not just about creating a focused campaign. It is also about automating it with smart logic to convert those one-time emails to Drip campaigns with multiple scheduled and logic-driven follow-ups to get the most out of the campaign.

Steps to Create an Email Campaign
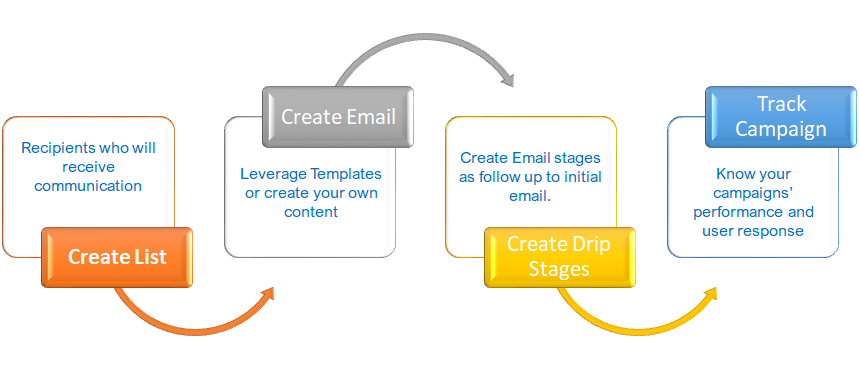
Please follow the steps below to create a Drip Campaign:
1.Create List
2. Create Template
3. Create Email Drip Stages
4. Track Campaign
Step 3. Create Email Drip Stages:
Click on Engagement tab in the left navigation bar and click create under Campaigns
- Add New Stage – Add additional stages as needed for your email campaign from the left navigation panel. If it is a standalone email; e.g, a newsletter, then just fill in the other details.
- Campaign Name – Name the campaign as per your requirement for this email campaign
- From – Add From options on the screen (Tips – you can have multiple From option, to configure additional From options, email support@insuredmine.com)
- Send – Email can be pre-scheduled in three possible ways
- Send immediately – as soon as the campaign is created and ready to go.
- Send at a predefined Date and Time – select the date, time of your choice and schedule accordingly.
- Send After a certain number of days, week or month as you deem necessary.
- Template – Select the template from the dropdown. (Tips – (1) before drafting a campaign make sure all the required templates are available or created with appropriate title and subject line (2) Templates can be now categorized and organized in a folder.)
- The subject line may be auto-populated based on the template you pick.
- Signature – it is optional to include a signature at the end of the communication. You can also pick signatures, like templates, from your signature repository.
- Sequence – Identify and create a list of a specific target audience for this communication and select it from the dropdown.
For Stage 2 and further, Agents can further refine their recipients with additional logic based on the recipient’s response to the communication. For example, in stage 2 of the campaign, Agents can target only those who opened/clicked a link/opened but did not click/received etc.
Expert Tips: A future stage in a campaign can be edited and expanded very easily even after the campaign is already triggered.
Analytics on the campaign is available by stage on the campaign detail page. Agents can see who has opened/clicked and how many times. The agent can also download a CSV report of the recipients who have received/opened/clicked/bounced/delivered/rejected the email.
Step 4. Track Campaign:
- Track detailed user behavior in realtime for each email campaign by viewing the Email Campaign Overview screen.
- Filter the campaign list based on Date Filter
- View a detailed analysis of the campaign by clicking the name of the particular campaign.
Enhancement! August 2020
Skip weekend in email campaigns
Skip weekend in Drip Campaign allows you to send emails only on working days/ business days. No emails will be received from 12:00 am Saturday to 11:59 pm Sunday by contacts.
Use Case: When you set up automation in Drip Campaign or Single Contact Drip for auto follow-up emails/Text and set Stage 1, Stage 2, etc. and if you trigger a campaign on Wednesday, and enter Stage2= after 3 Days. Then usually your email will be delivered on Saturday but we all know that it is better received, reviewed, and responded on weekdays, so by selecting the option “skip weekends”, that email will be delivered on the next business day i.e. Monday.
With “Skip Weekends” enabled, it is assumed that the number of Days set for the various Stages is “business” days.
Reply to – option in email campaigns
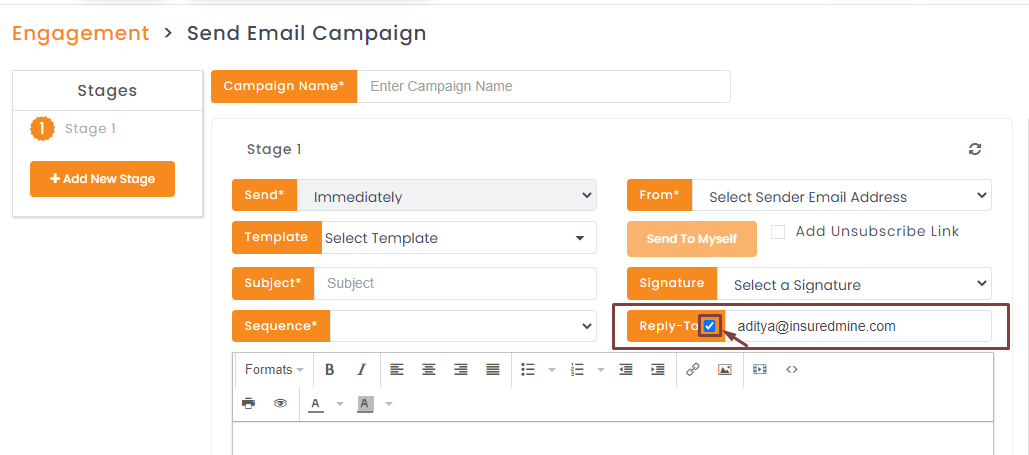
You can customize the email setting, to receive the reply from the user at a specific email address and not the default sender address. This feature is helpful to receive responses at a support email id or directing emails to an agent dealing with the client issues.
Note: You can select only one email id for receiving response.
While sending an email campaign, you have to mark the Reply to and enter the email id, design the campaign as desired and send it to the chosen contacts. The reply from contact will not be received on the sender email id rather it will be displayed in the selected email mentioned in the reply to field.

Include specific time in Send email
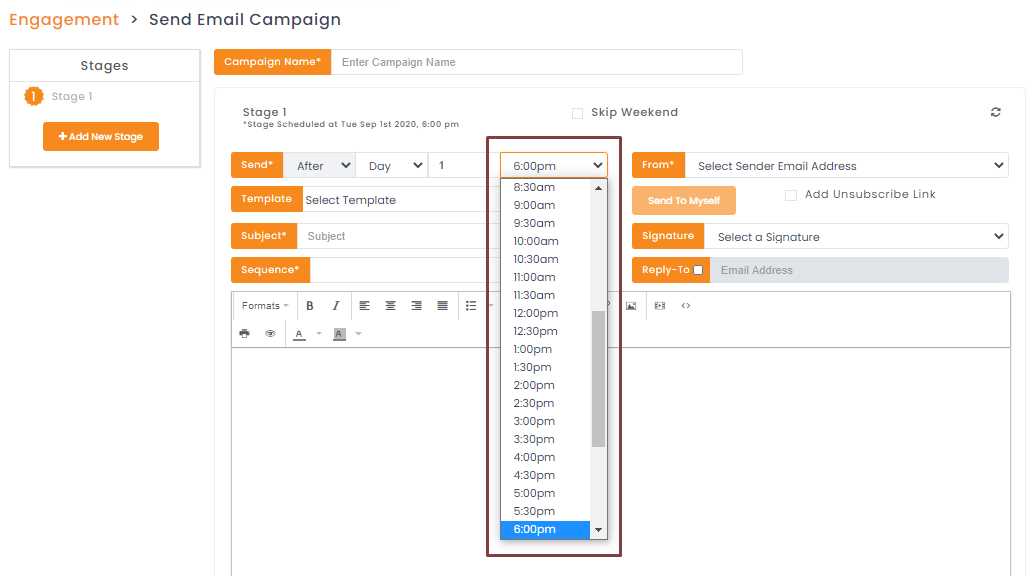
Mostly, we send email campaigns just setting the after trigger days. Now, you not only have an option to send it after day, week, or month. But, you can send it at a specific hour to deliver it at an appropriate time.
The following steps will walk you through for sending email messages at a specified hour after days, months or weeks to trigger the campaign.
- Navigate to Engagements>Email Campaign>Create
- While designing the campaign, in the Send field, select After.
- Select the day, week or month.
- Enter a valid number for the respective category.
- Select the time to trigger the campaign.
- Fill the other required aspects as mentioned above in the Create Email Drip Stages segment and click Send.
You will notice the * stage schedule at reflecting exact date and time for the scheduled trigger appear below the Stage.

Clone Email Campaign
The “Clone email campaign” will help you create your campaign faster and reduce your time and effort building a campaign. If you click on Clone Campaign, it will populate all the details from an existing campaign into a new campaign.
Navigate to engagements
Create and launch an email campaign
Once the campaign has been launched. Click analytics under Email campaign.
Navigate to the sent email campaign list
Select the email campaign and click on the 3 dots
Select clone campaign

You will sent to the ‘create campaign’ page where you will find all stages pre-populated based on the selected campaign.


