In this article, you will learn:
- How to add an X-date from the Contact section?
- How to add an X-date from the Contact section?
- How to edit or delete x-dates of a contact?
- How to map single or multiple x-dates for multiple contacts?
- How to add an x-date and create a new contact at the same time?
- X-date functionality in Opportunity module
- X-date in Contact 360 section
- X-date in Account 360 section
- X-date in version 1 and Version 2 deal card
- Download a contact list based on x-dates from the opportunity section:
- How to upload the x-date data?
- X-Date functionalities removed from the following sections.
- X-date in Contact 360 section
X dates are prospecting opportunity dates set by the agents to reach out to the prospect before the due date or expiration date of the existing policy. The existing policy may belong to a different carrier and hence an opportunity can be tapped for quote conversion in favor of the agency.
Note: X-date automation will run based on the month and day.
How to add an X-date from the Contact section?
- Navigate to Contacts
- Click on add new
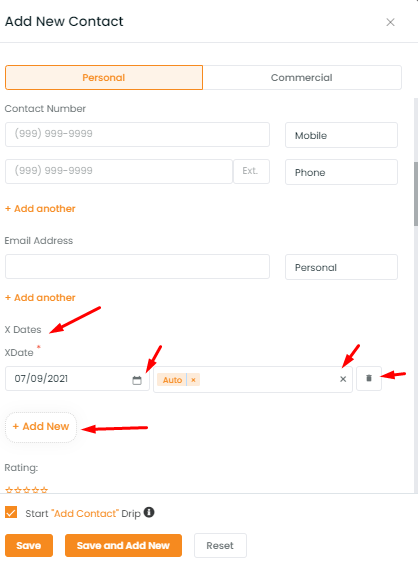
- Scroll down to x-dates
- Click on add new

It will pop up one x-date input box where you can put the x-dates.
Note: You can put any x-date of your choice. The date field is mandatory. Category fields can be empty, single, or multiple. In case you want to remove any category, click on the cross sign to remove the selected category.
Note: You can add multiple x-dates. But unless you provide a valid x-date in the previous one, you cannot move to create a new x-date. You can create ‘n’ number of x dates for a contact.
If you add any contact with x-date, it will be shown in the x-date column.
Note: To activate the x-date column you need to click on table column view and select x-date column and click to reposition it accordingly. If you have multiple x-dates for a single contact, it will be displayed with more icons. Click on it to view the x dates. Scroll down to view all the x-dates.


How to edit or delete x-dates of a contact?
If you want to edit or delete x date of a particular contact. Click on the contact and scroll down to select x date from the left panel. Click on edit icon to update or delete the x-date section.


How to map single or multiple x-dates for multiple contacts?
- Select multiple contacts and click on the add x-date option from the top.
- A panel from the right will open to put the x-date.
- Click to save


How to add an x-date and create a new contact at the same time?
- Click on the global add button
- Scroll down to select x-date
- Add the contact name and add the x-date
- Click on save
This will create a new contact with x-dates.


X-date functionality in Opportunity module
Once you add x-date it will be showing in the x-date section under the opportunities module too.
- Navigate to opportunities.
- Select x-date.
- You can find the saved contact in the x-date list.

Note: If there are multiple x-dates for a single contact, then there will be multiple entries with each x-date in the x-date list. For example, if a contact named Indrani has 2 x-dates, then 2 different entries will be visible with the same name.

Note: If you delete any x-date from this x-date list under the Opportunities section, it will not be removed from the contacts. Only x-date opportunities will be deleted.
If you click on Add new tab in the x-date section under the Opportunities module, it will open the window where you can add a new contact and insert an x-date for the contact.


X-date in Contact 360 section

X-date in Account 360 section

If you mark any deal as lost and set and x-date, the x-date will get populated in the contact section under the others tab.
To see the enhancement:
- Scroll down to view the deal card of the contact.
- Click on card history.
- Click on the deal title to go to the deal card section
- Navigate to the quote section.
- Add new quotes
- Mark the deal as lost.
- Set x-date.
- Click on submit.
- Navigate to the contact and you can view the new x-dates that are added.
Note: And if you don’t mark the x-date then it will not get populated in the contacts.
X-date in version 1 and Version 2 deal card
If you mark a version 1 deal card as lost and mention the x-date, it will be also populated under the others tab in the contact section. But here the x-date will not have any categories. But if the deal card is a version 2 card then there will be an x-date along with the categories.
Filter Contacts based on month-wise x-dates
If you navigate to the contact page and click on the filter, you will have the x-date option. You can sort your contact based on x-dates.
Note: Here x-date options are given on a month-on-month basis. Select the months so that you can find contact with the x-dates that fall within those months.

Even in the opportunity section, you can filter contacts based on the x-date month range.
- Navigate to opportunities
- Select x-date
- Click on filter
- Select the month range
- Click on apply
You will have all the contacts with x-date within the set filter range.

Download a contact list based on x-dates from the opportunity section:
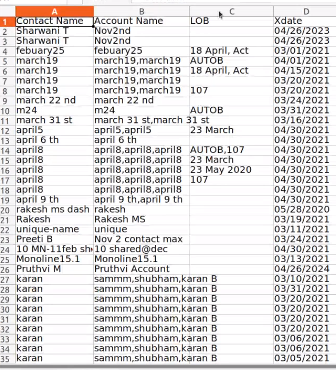
- You can also download the x-dates by clicking on download under settings.
- The list of contacts will be downloaded in excel format.


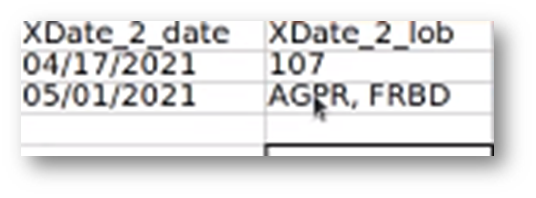
Note: If you download the excel file, the contacts with multiple x-dates and multiple categories (LOB- Line of Business), will be represented in separate columns. And if one contact has one x-date and multiple categories then it will be displayed in the same column separated by a comma.

How to upload the x-date data?
- Navigate to contacts.
- Click on the 3-dot icon and select the upload icon.

- Download the CSV/ Excel sample file.

- Upload your file.
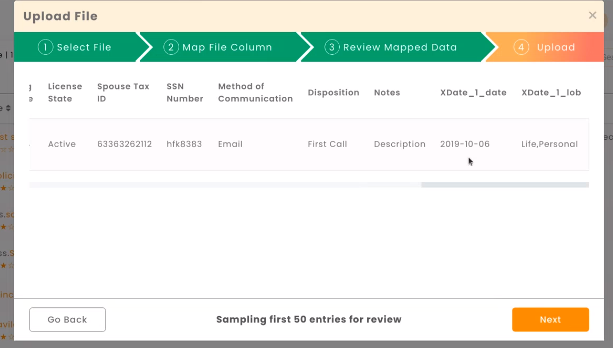
- Map the x dates

- Click next to upload it.

X-Date functionalities removed from the following sections.
Note: The x-date policy option in the add policy section has been removed.
Note: If you go to the report section, the x-date filter option has been removed.
Enhancement: June 2021


