In this article, you will learn:
The Contacts module in InsuredMine is all about managing and optimizing your contacts for sales and client relationship management. It allows you to easily upload, edit, and organize contacts, set up contact automation, view detailed contact information, add notes, send emails and SMS, and perform various other actions to optimize your contact-related tasks.
Use case: With Contacts Module, you can improve client engagement and simplify contact management.
But first, let us understand how to access the Contacts module:
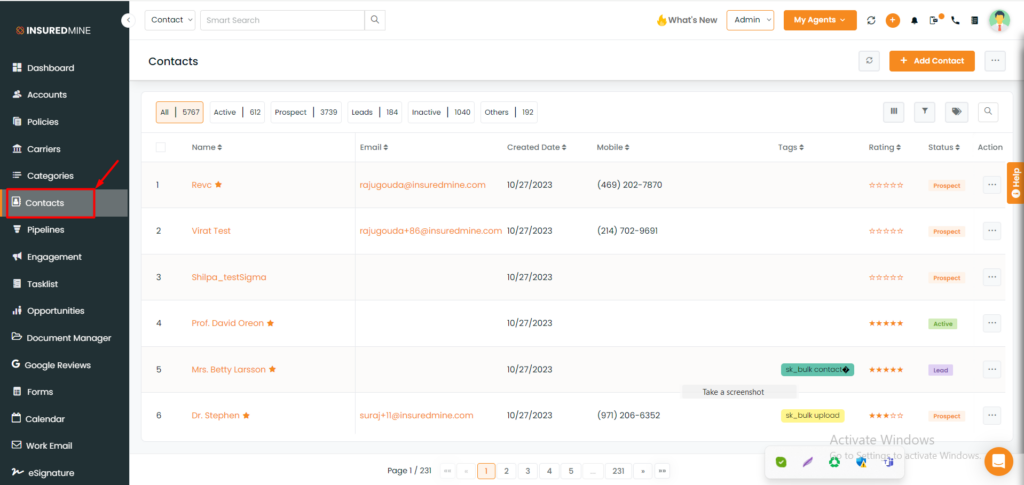
You can easily locate the Contacts module from the left sidebar menu.
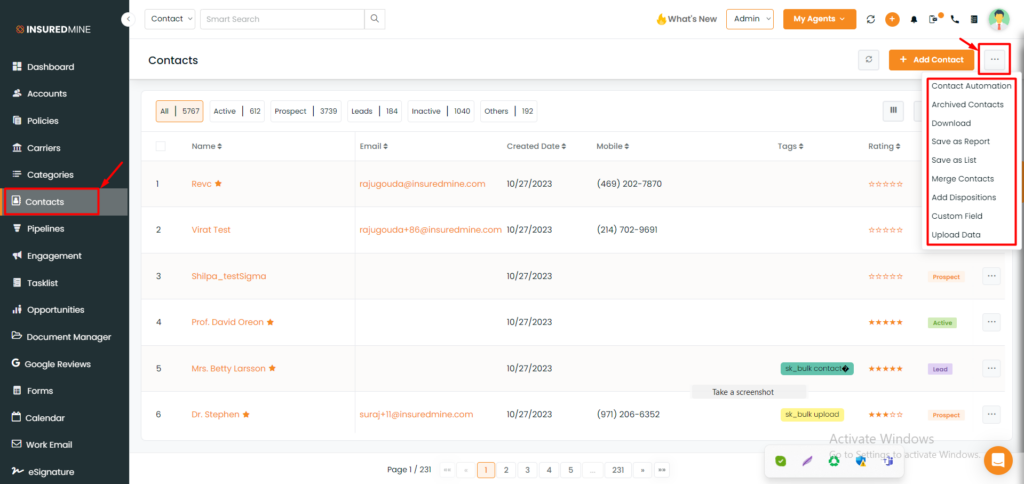
In the Contacts module, click on the three-dot icon in the top-right corner to access various options such as:
- Contact Automation, Archived Contacts, Download, Save as Report, Save as List, Merge Contacts, Add Dispositions, Custom Field and Upload Data.
How to add a Contact?
There are three options for adding contacts.
Option 1:
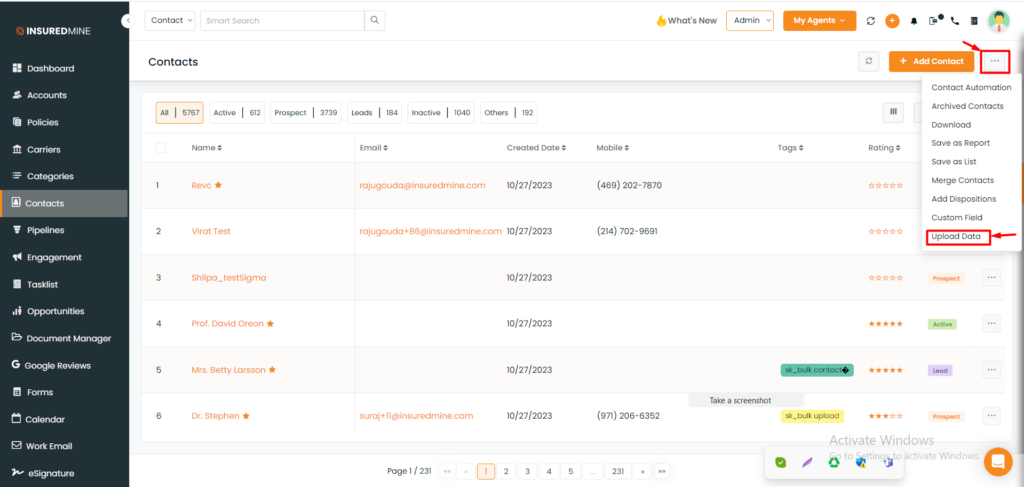
- You can upload your contacts by clicking on the three dots and selecting the ‘Upload Data’ icon for a seamless CSV upload.
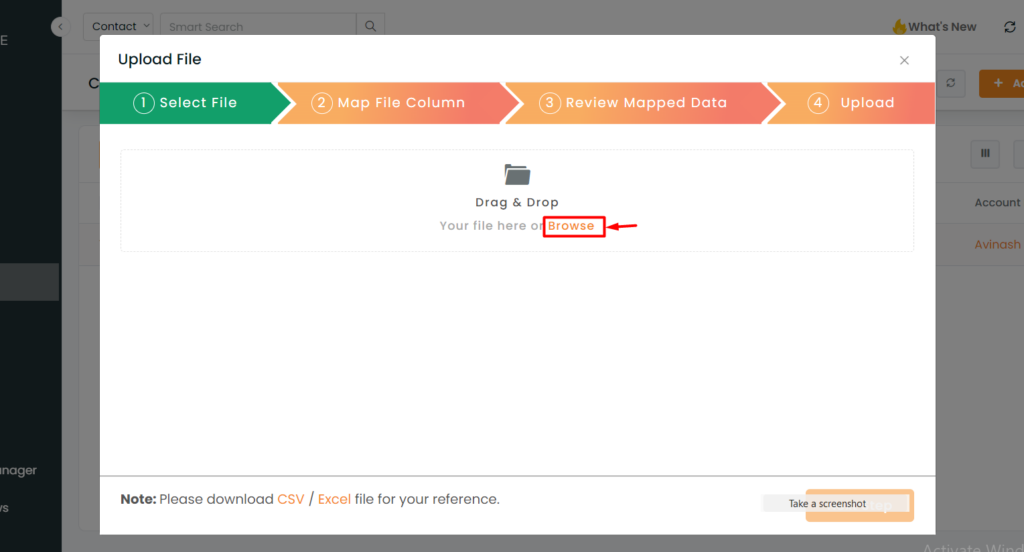
A dashboard will appear as shown above, where you can drag and drop the CSV/Excel file.
Option 2:
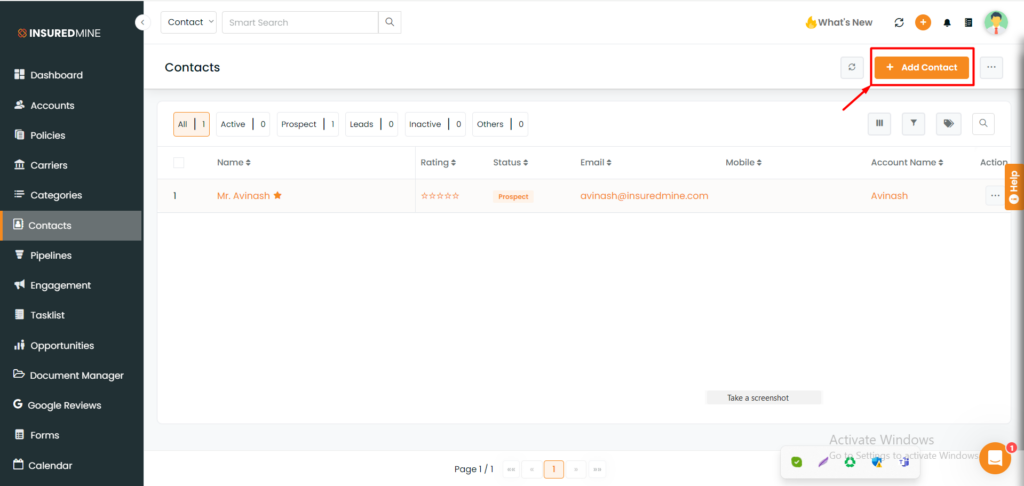
- Or, you can manually add new contacts by clicking the ‘Add New’ button.
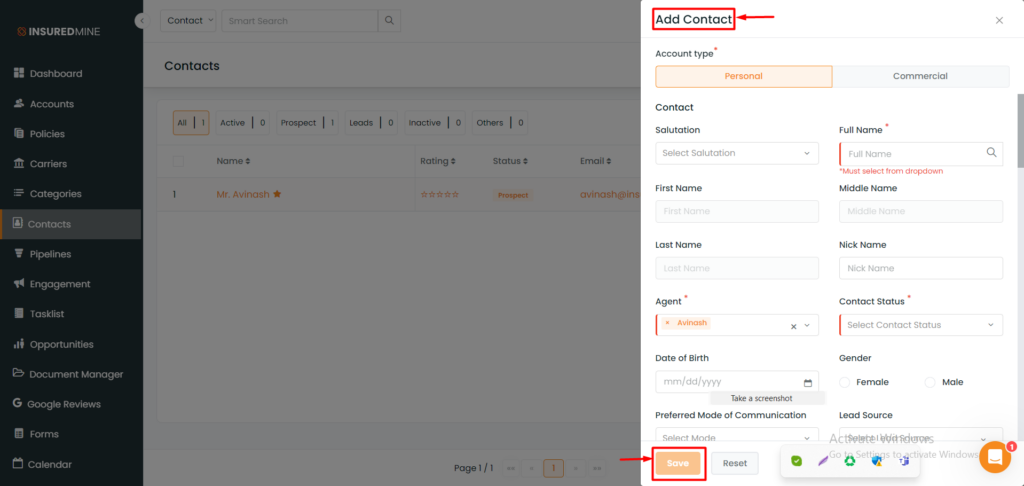
- A minimized window will appear. Select your Account type: Personal or Commercial.
- Complete the remaining details.
- Click ‘Save’ to confirm.
Option 3:
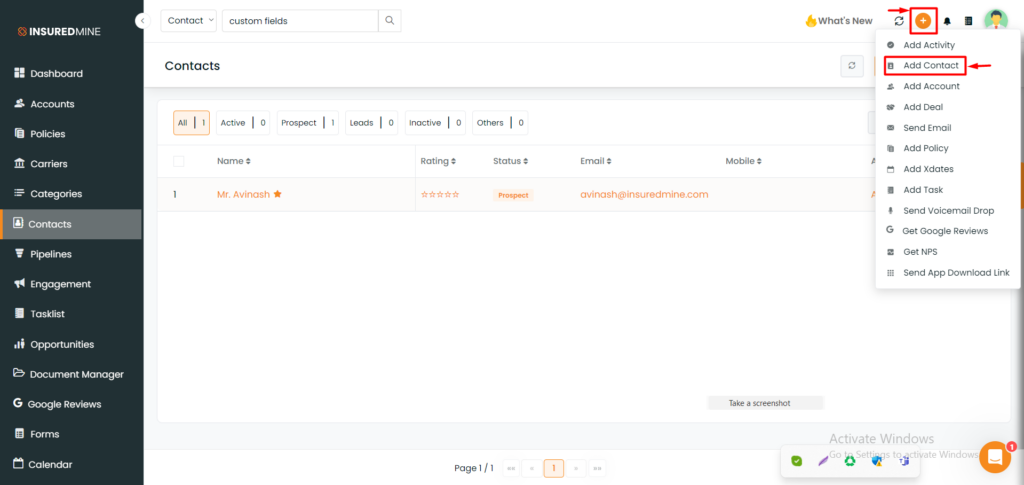
- For swift and efficient contact management, you can easily add a contact through the Quick Action button.
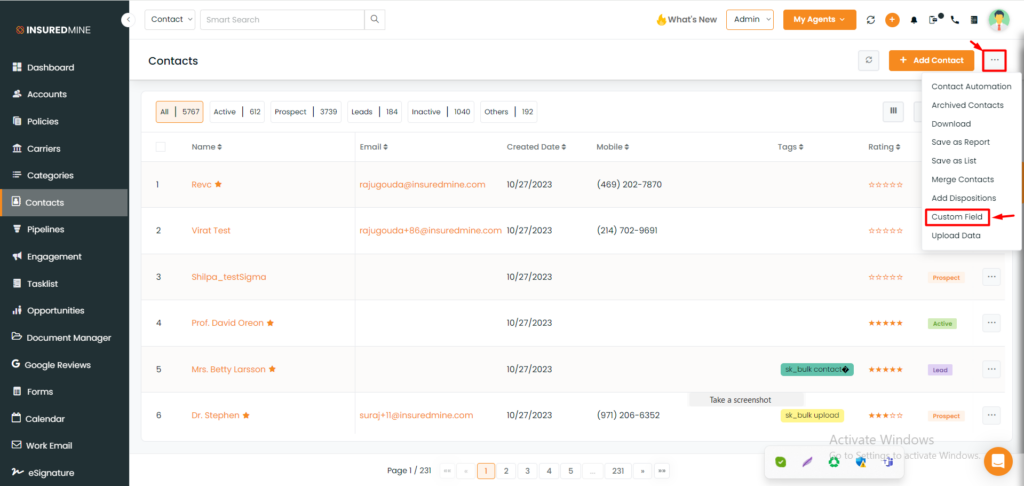
- To include extra contact details such as house numbers and references, consider using custom fields.
How to Delete Multiple Contacts?
Deleting multiple contacts at once saves time by improving the process and reducing the need to delete contacts manually, which can be time-consuming.
To Navigate:
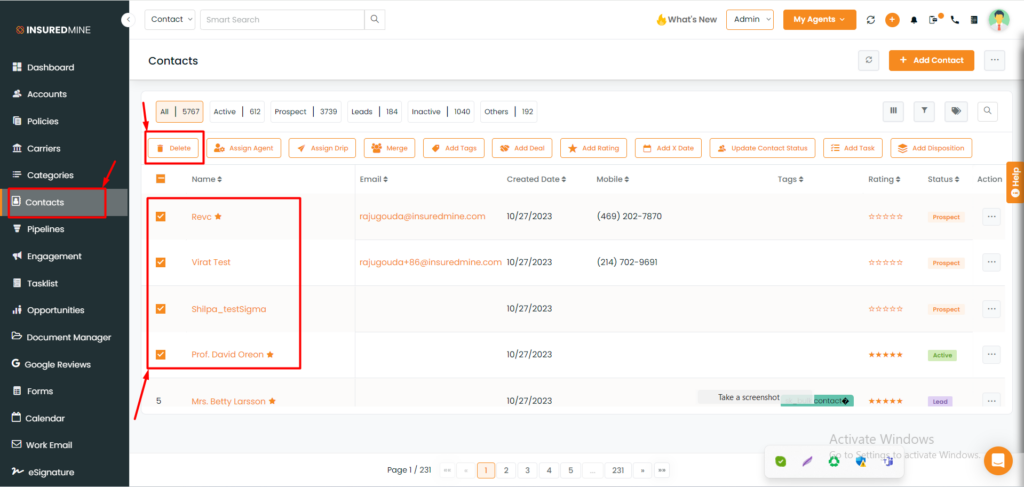
- Go to the Contacts Module.
- Select and remove multiple contacts by checking the boxes. For instance, I’ve chosen 4 contacts.
- Select “Delete.”
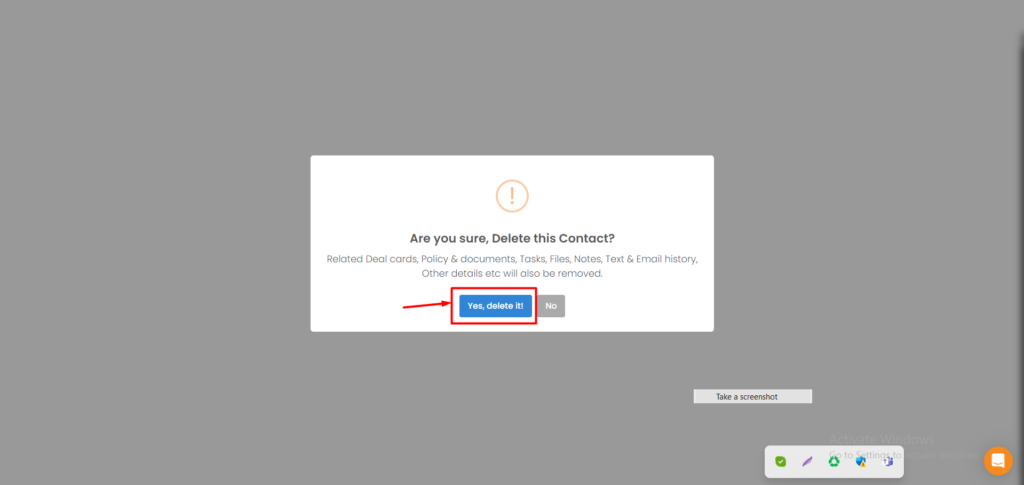
- You will get a warning message saying: Are you sure, Delete the 1 selected Contacts?
- Confirm if you choose to delete the selected contacts.
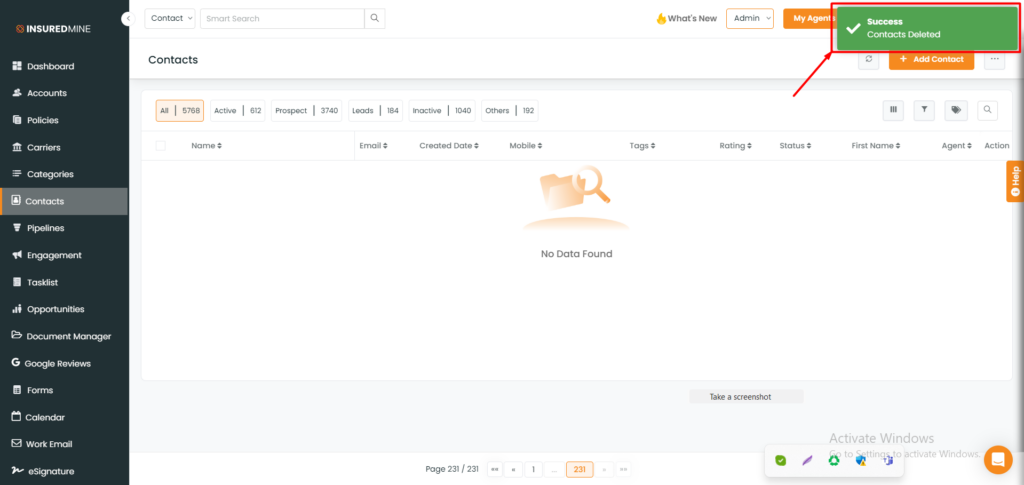
- A message for successful completion will be displayed: Contacts Deleted
Contact Automation:
Contact automation lets you create personalized emails and send them automatically when you add a new contact. Just follow these simple steps to set it up.
Now you can access the “Contact Automation” feature from settings as well as from the Contacts module.
To access Contact Automation:

- Go to the Contacts module from the left sidebar.
- Click the three dots icon in the upper right corner.
- Choose “Contact Automation” from the drop-down menu.
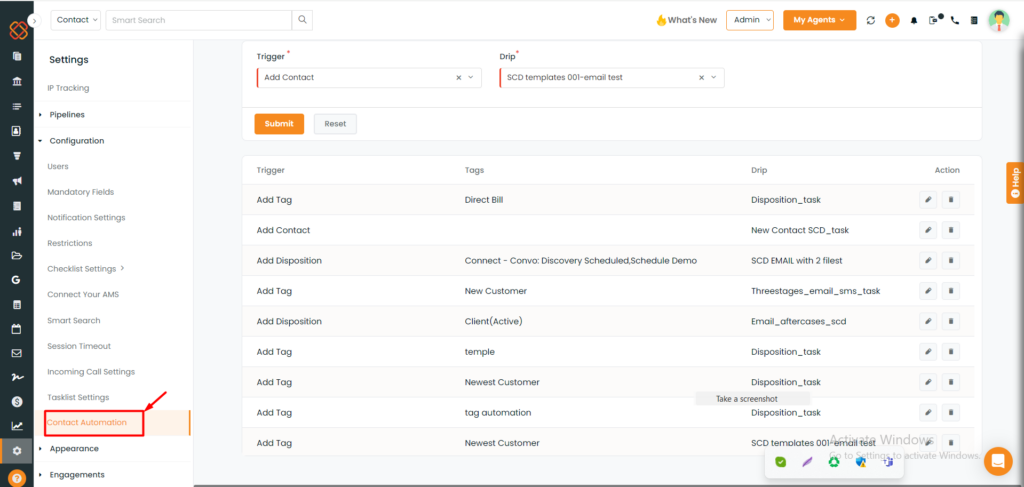
- We can now also access Contact Automation under the settings module.
To Trigger Automation:
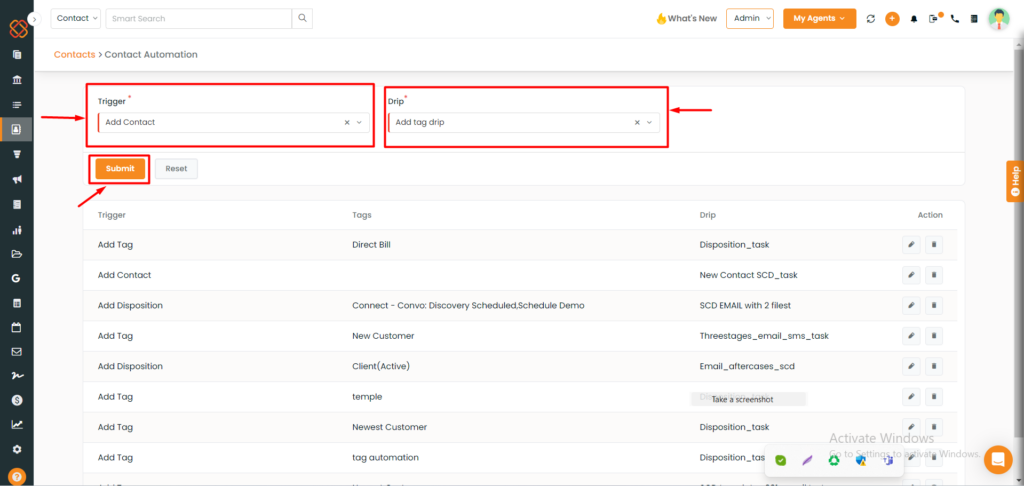
- Add a Contact in the “Trigger” section, choose the “Drip” option for the email series you want to use when a new user is added.
Note: The default setting for initiating the “Add contact drip” campaign is enabled. If you wish to delay the campaign’s activation, you can deselect this option in the “Add New Contact” scrolling window.
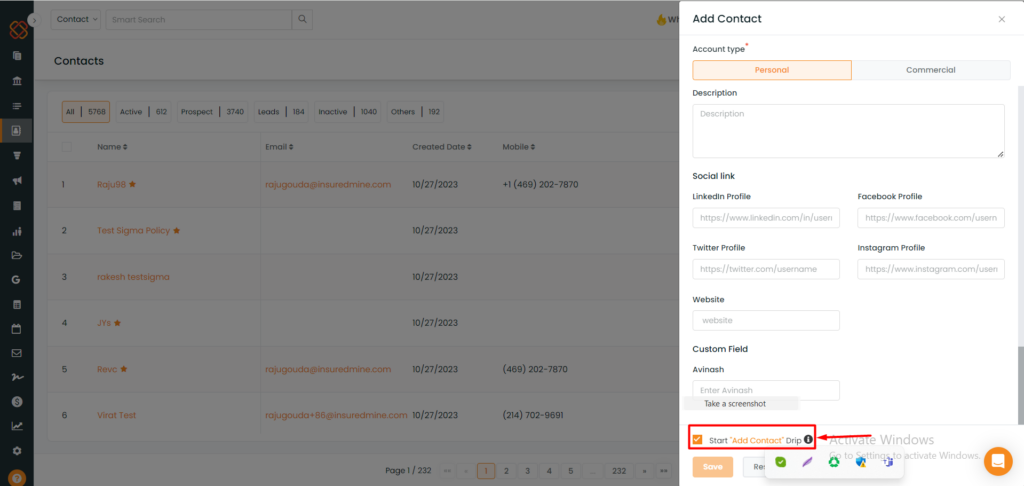
Enhance Contact Automation Trigger with Tagging and Disposition
Options:
You can initiate a drip campaign while simultaneously assigning tags and dispositions to a new contact.
To set up a trigger for adding contacts, follow these steps:
- Go to the Contacts module from the left sidebar.
- Click the three dots icon in the upper right corner.
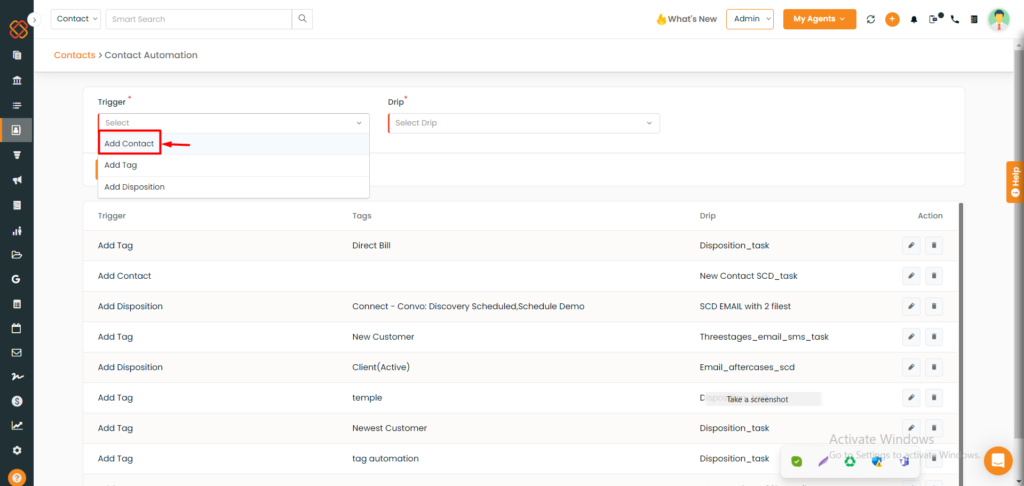
- Select “Add Contact” as the trigger action.
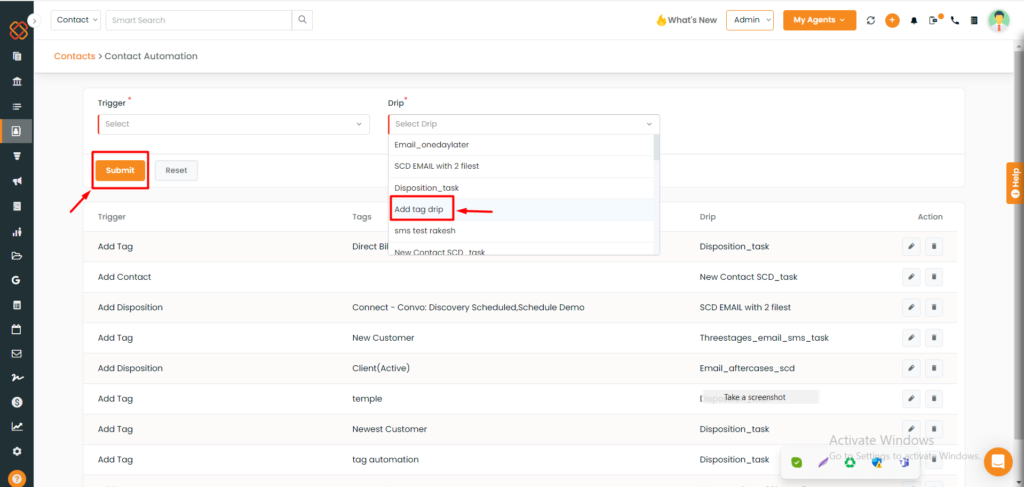
- Pick the desired Drip campaign from the dropdown menu.
- Click “Submit” to create the trigger for newly added contacts.
To Create a Trigger from a Tag:
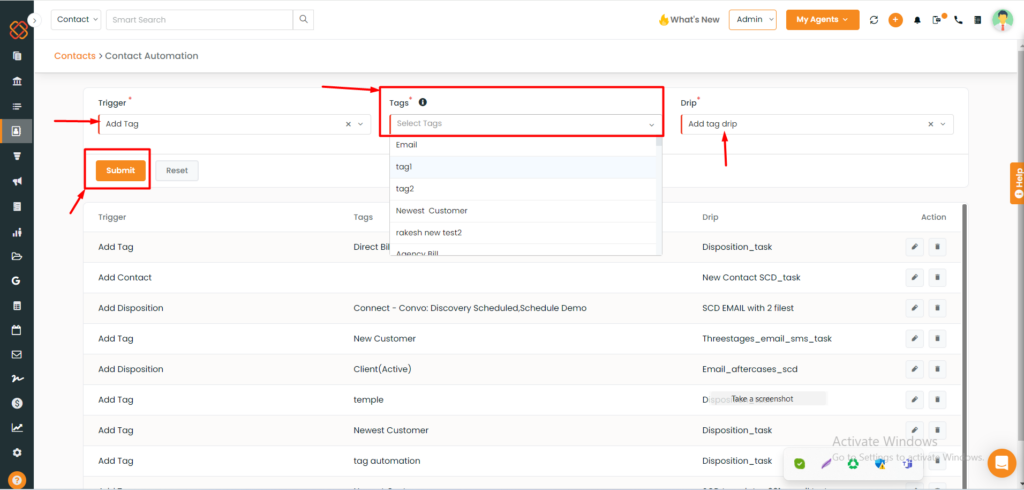
- Click the “Trigger” dropdown and choose “Add Tag.”
- Select the desired tag from the dropdown menu.
- Pick the drip you want to associate with the tag.
- Click “Submit” to create the tag-trigger relationship.
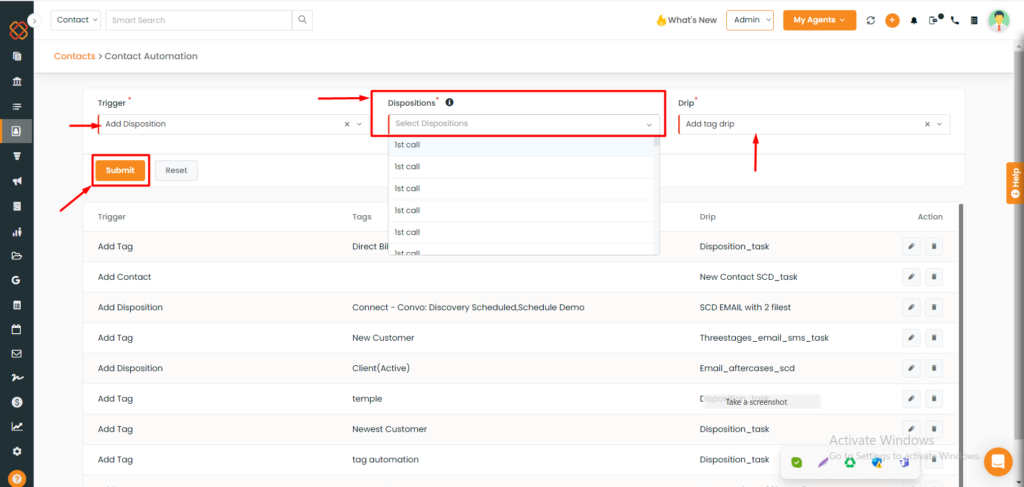
Adding a Disposition trigger:
- Click the “Trigger” dropdown menu and choose “Add Disposition.”
- Pick a “Disposition” from the dropdown list.
- Select the drip, then click “Submit” to create the add disposition trigger.
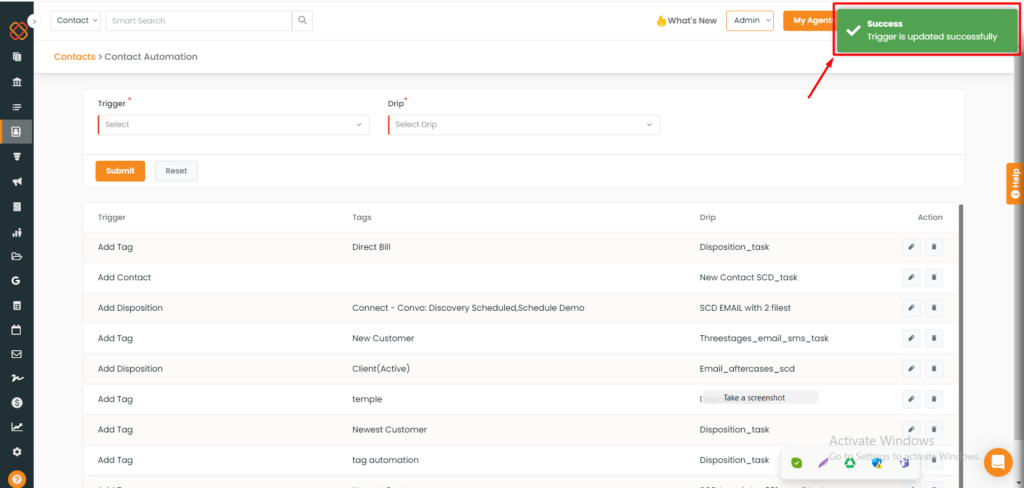
- After successfully adding these triggers a notification banner will be displayed: Success Trigger is updated succesfully.
These added triggers will run when a contact is added with satisfied conditions.
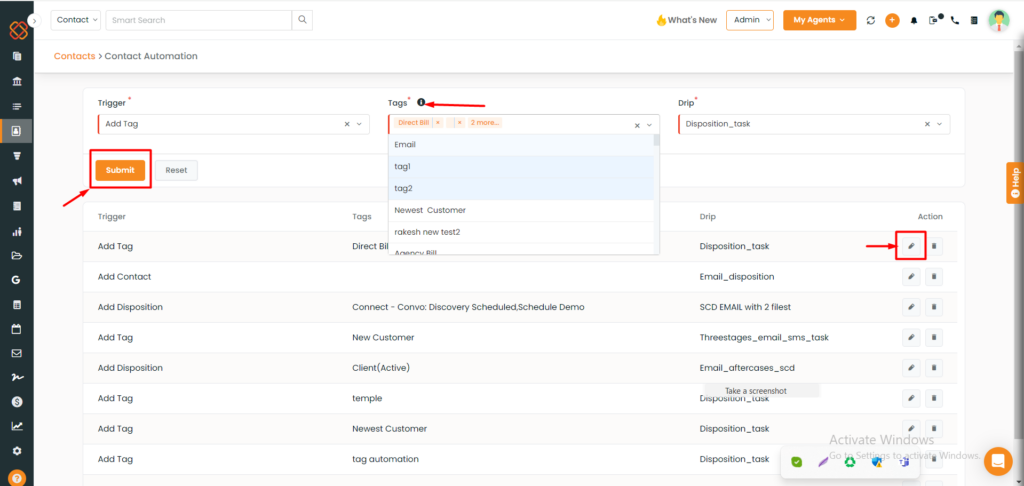
- To edit a trigger, click the edit icon for that trigger. For example, to add more tags, click “edit” and add them in the “tags” section.
Note: You can set up Add Trigger automation and add disposition automations for different tags but, you cannot setup Add Contacts automation for a contact, but you can edit the previously Add Contact trigger that you have created.
Contacts Overview:
Gain valuable, real-time data on your clientele, including All, Active Clients, Inactive Clients, Leads, Prospects, and Others. Simply click on the respective figure to access a more detailed list of contacts.
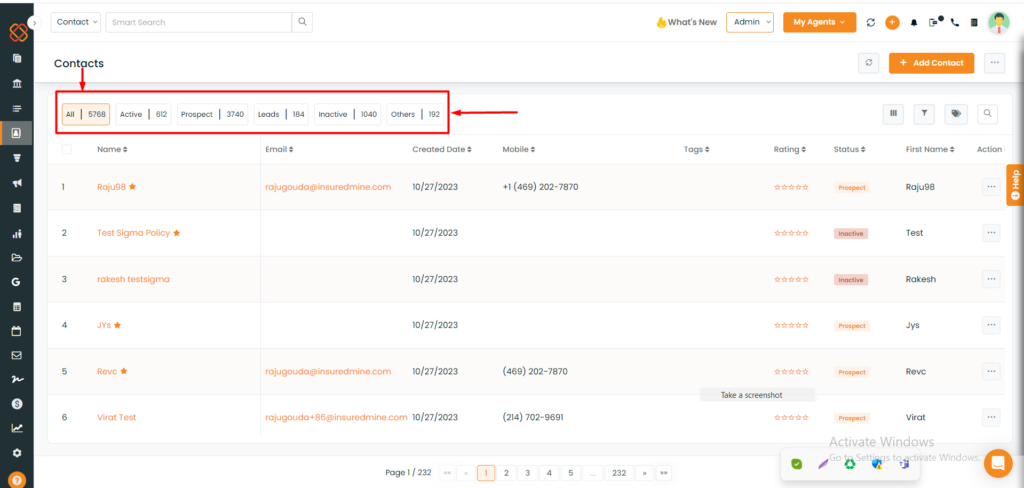
Active clients: Current customers with active policies.
Inactive clients: Former customers with no active policies.
Prospects: Interested contacts for your policies.
Leads: Target clients not yet interested in your policies.
Others: Contacts outside your target audience.
How to Select table columns?
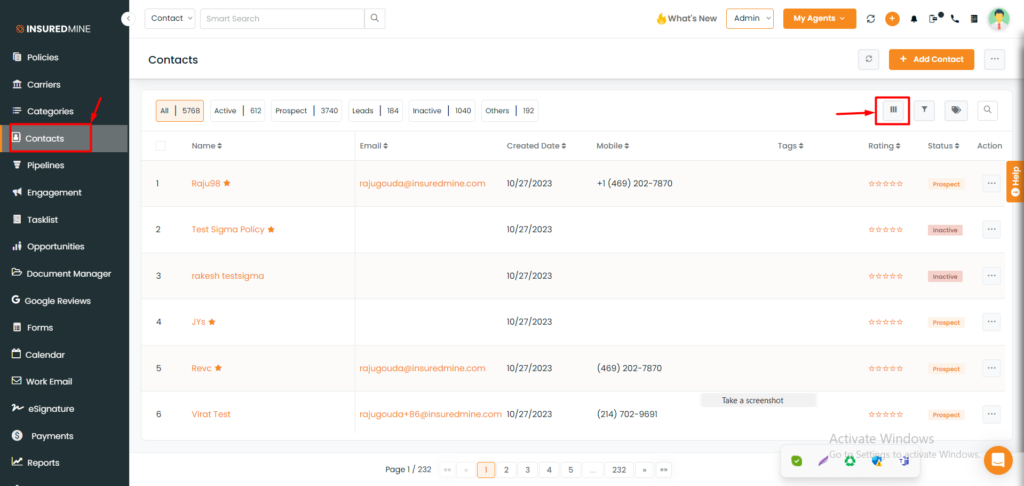
- To add columns to a table with 44 available columns and make them visible according to your preferences, you can follow these steps:
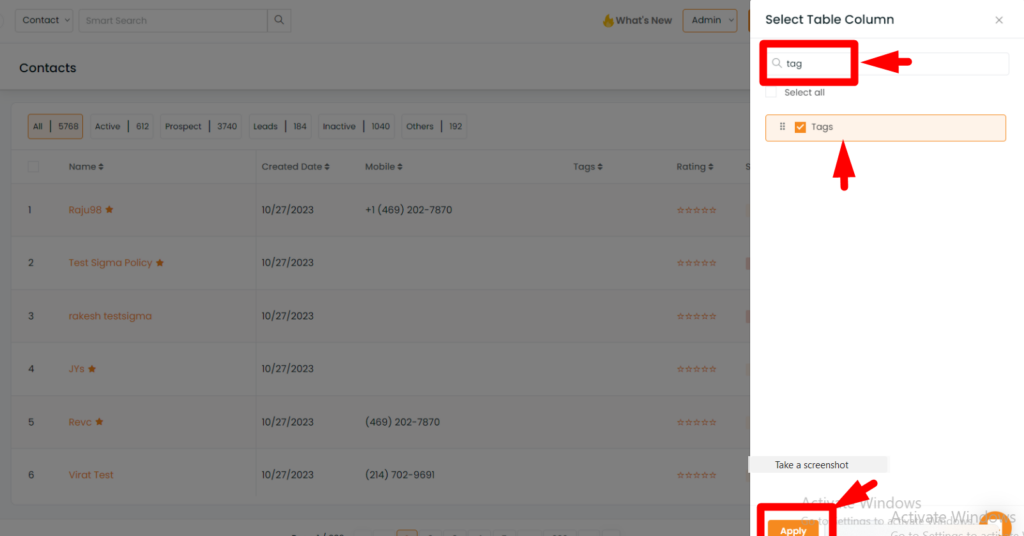
- Select any column you want to check according to your preferences. For instance, I want to see contacts that have “tags” attached to them.
How to Apply Filters to the Contact Records?
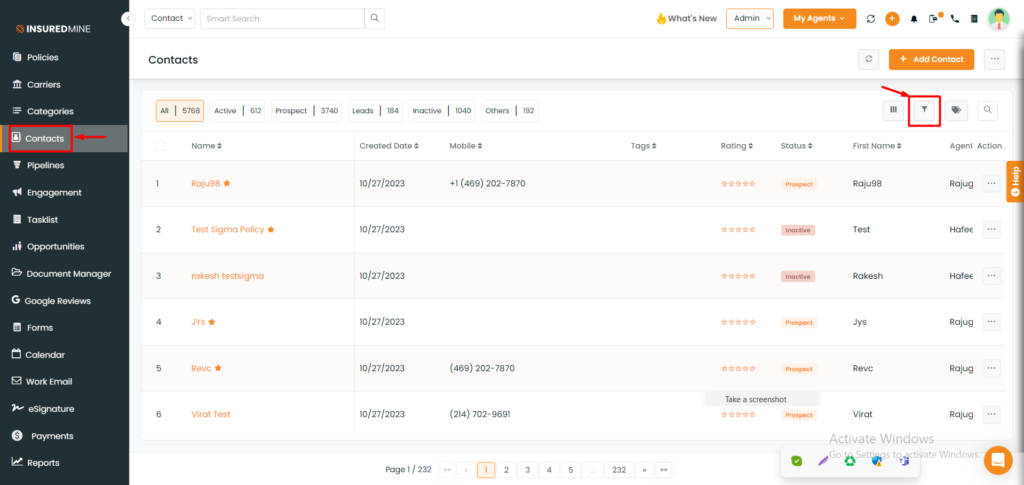
- You can apply filters to the contact records by clicking on the filter icon.
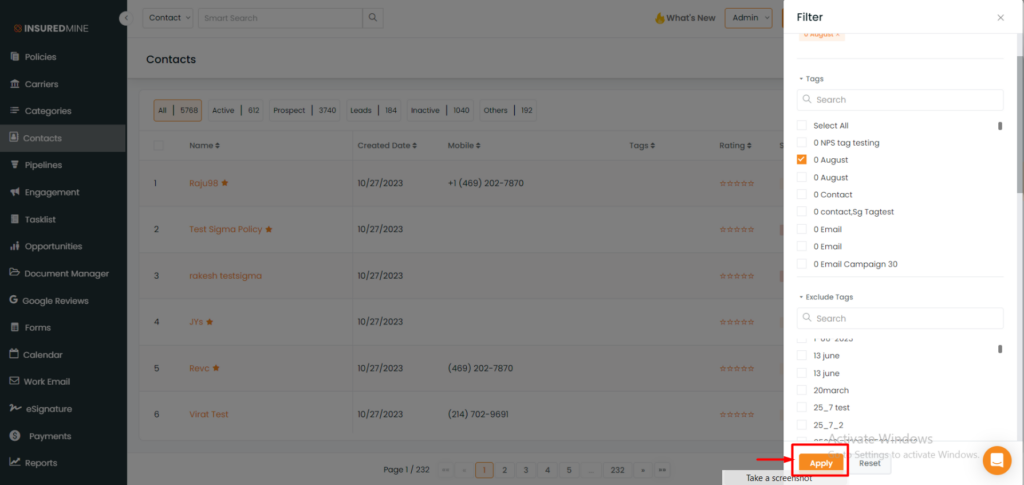
- Filter each of the contacts by adding Tags, Rating, Gender, City, States, Created Date, Lead Sources, X dates, Disposition, Disposition.
Contacts 360
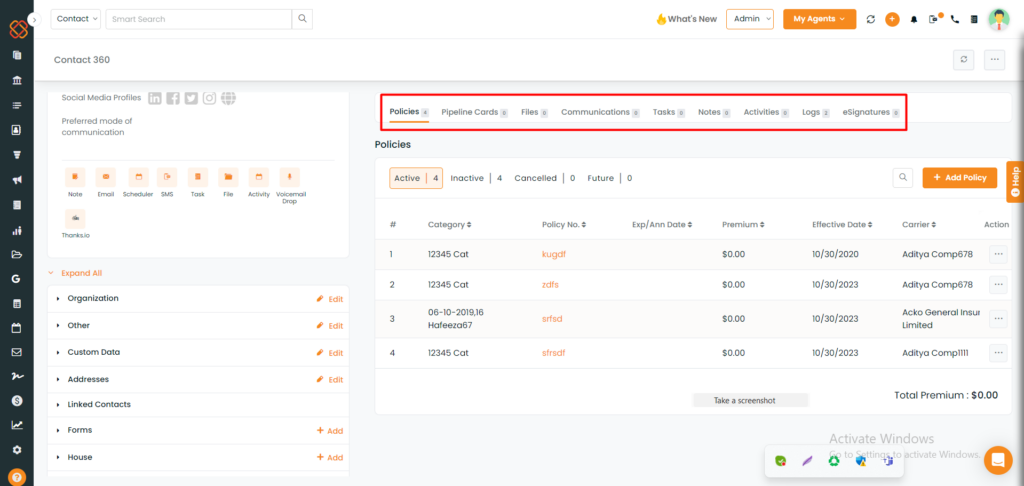
Easily access contact details and track their journey through all interactions and marketing optimization, all in one place.
Policies: Get a clear view of a contact’s policy details, including the number of policies held, active policies, expired policies, and premium value, to gauge client potential.
Pipeline Cards: In the “Pipeline Cards” option, you can view the information of a particular contact, such as Deal Title, Pipeline Name, Created At, Assignee, Premium, Revenue, or add a deal.
Files: Access all documents associated with the contact, including those shared by the contact and uploaded from your end.
Communications: Review all email/text campaigns sent to the contact, analyze campaign performance, and adjust marketing strategies. Cancel email deliveries if needed.
Tasks & Notes: Manage tasks, add notes, send emails, schedule meetings, and more, all in one place, eliminating the need to switch between applications.
Logs: Keep a record of all actions for easy reference.
E-signatures: Select the ‘E-Signatures’ option to access Title, Document Name, Agent Status, and Created At information, as well as perform actions.
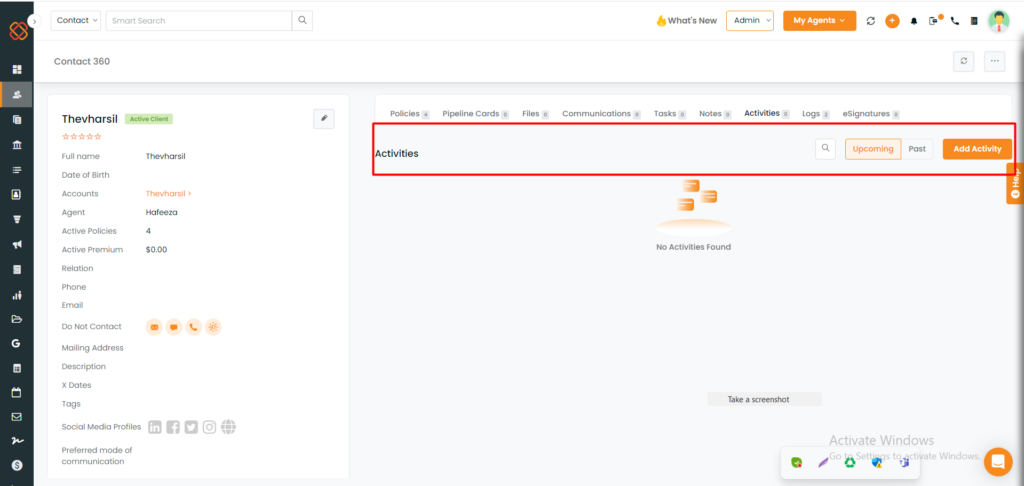
Activities: View upcoming and past activities for the contact.
Thanks.io and NPS details in Contacts 360
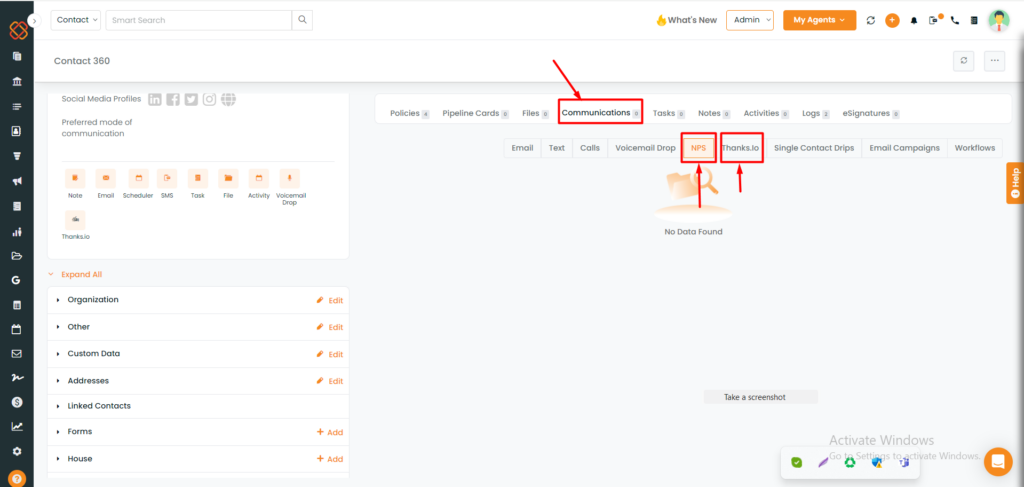
To view postcard or letter details sent via Thanks.io, click the Thanks.io tab in Contact 360’s Communications. Easily track transaction history, postcard type, size, delivery address, order ID, date, and source for quick review.
NPS has been added within the contact 360 page, you can now send an NPS in InsuredMine just within a few clicks.
How to view payment details in Contact 360?
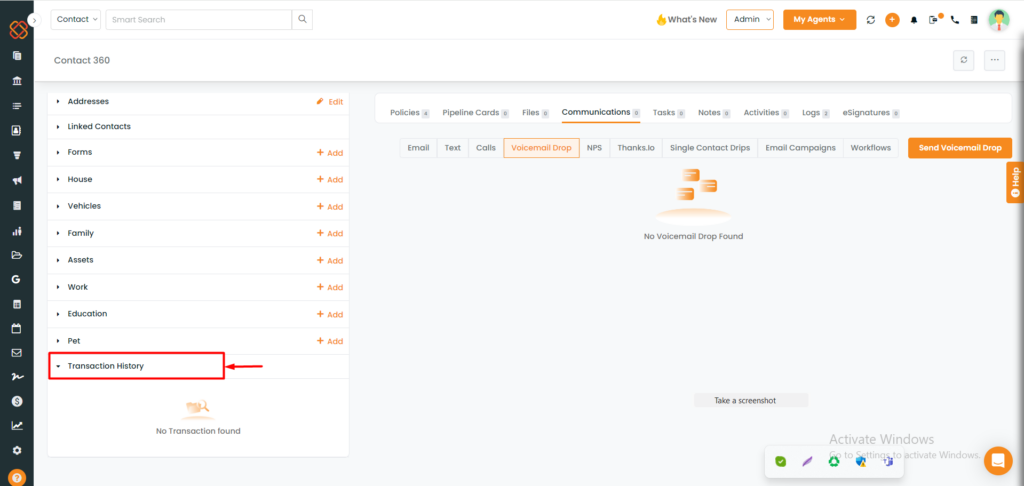
To view a contact’s payment details:
- Click “Transaction History” in the Contact 360 left panel.
- For clients with multiple policies, payment information is linked to the respective policy number for easy review.
Take Action in Contacts:
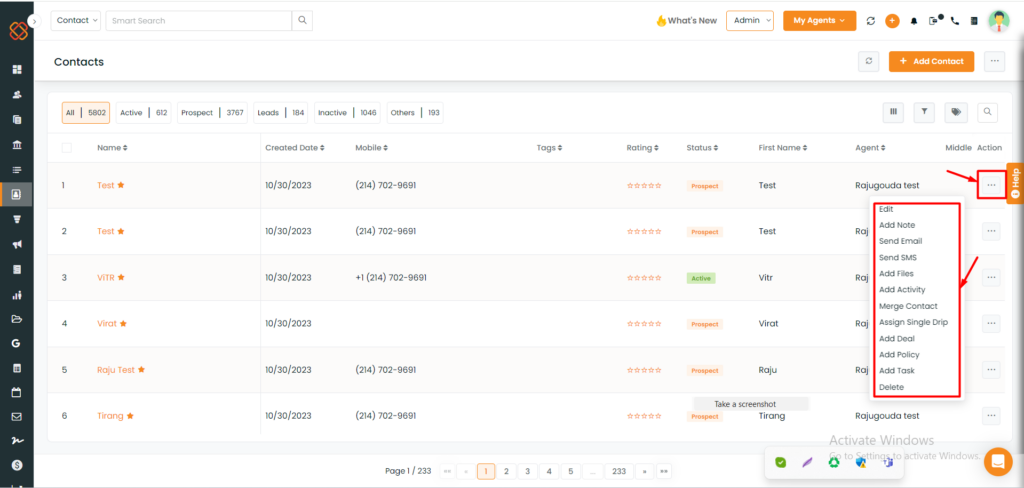
Each row in the contact list offers a range of actions for efficiently managing individual contacts. Let’s explore the functionalities of each feature:
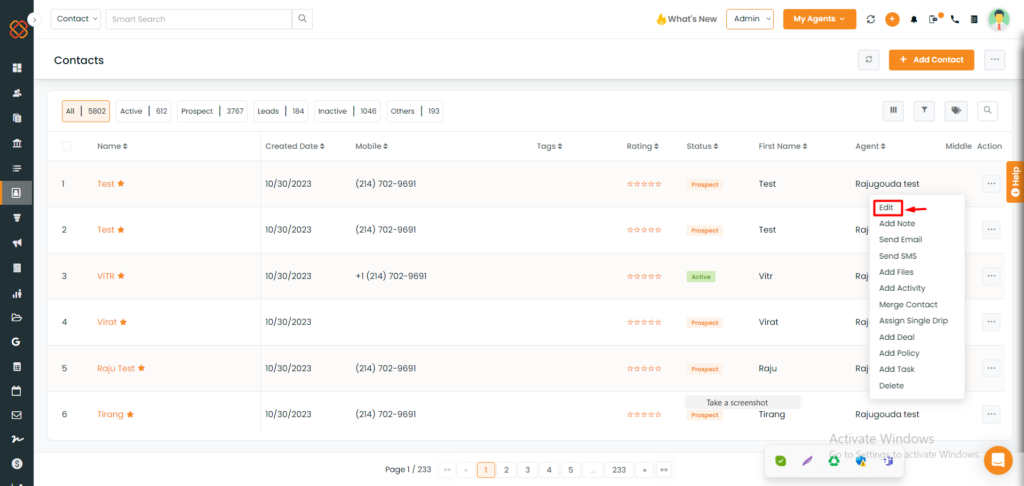
Click on the edit option of any contact you wish to edit.
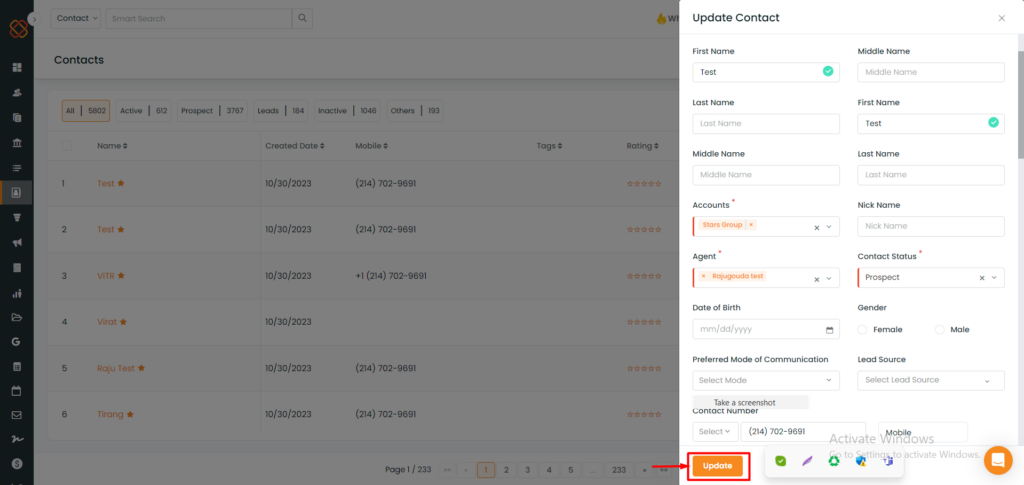
Use the “Edit” option to quickly update contact information by modifying field values and clicking “Update.”
Add Note:
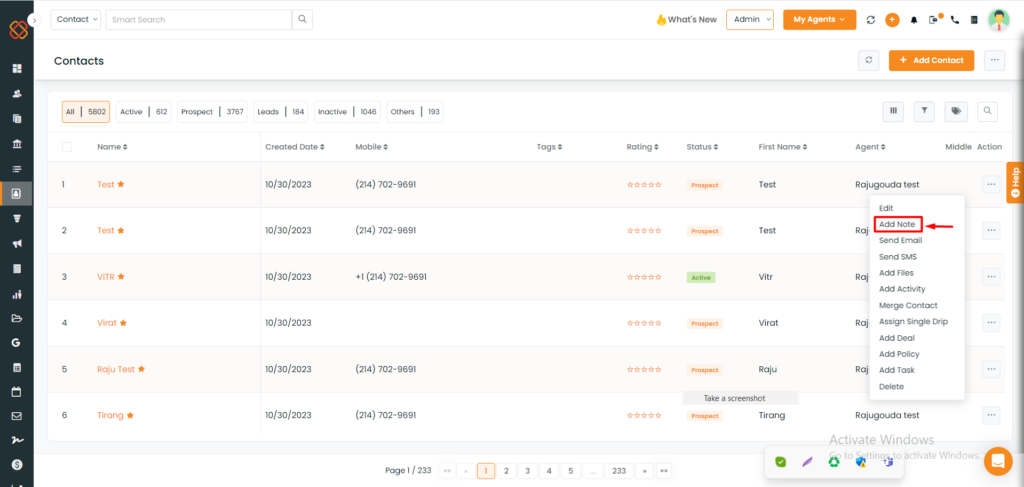
- Click on the Add Note option of any contact you wish to add note of.
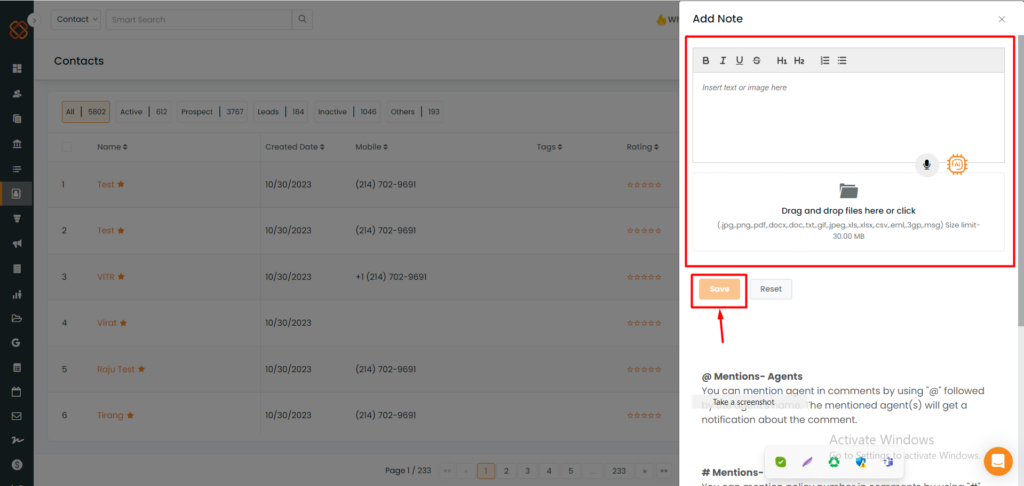
- A minimized window will now appear, simply write your note and click “+Add Note” on the pop-up screen. You can also use tags like ‘@’ for Agent Name, ‘#’ for Policy Number, and ‘*’ to hyperlink to the contact’s page and “%” for Accounts.
Send Email:
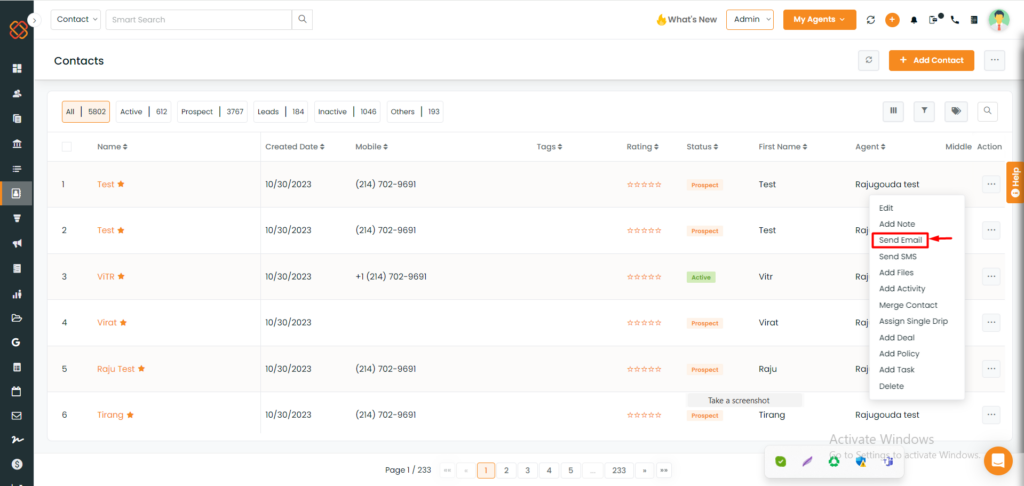
- Click on the “Send Email” option of any contact you wish to send email.
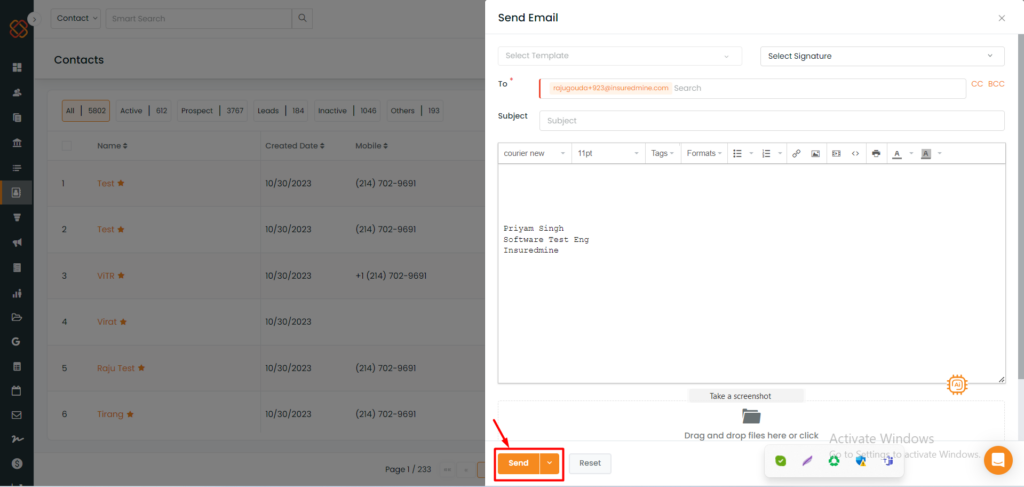
- A minimized window will now appear where you can send customized emails with templates and attachments to contacts. Track sent emails in the Activities Section under Contact 360 and viewed campaign analytics in the Campaigns segment.
Send SMS
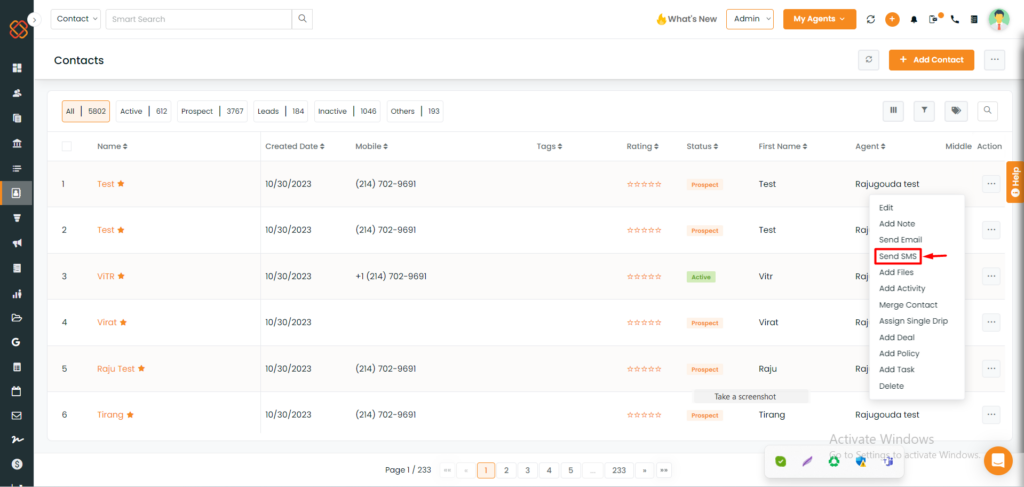
- Click on the “Send SMS” option of any contact you wish to send SMS.
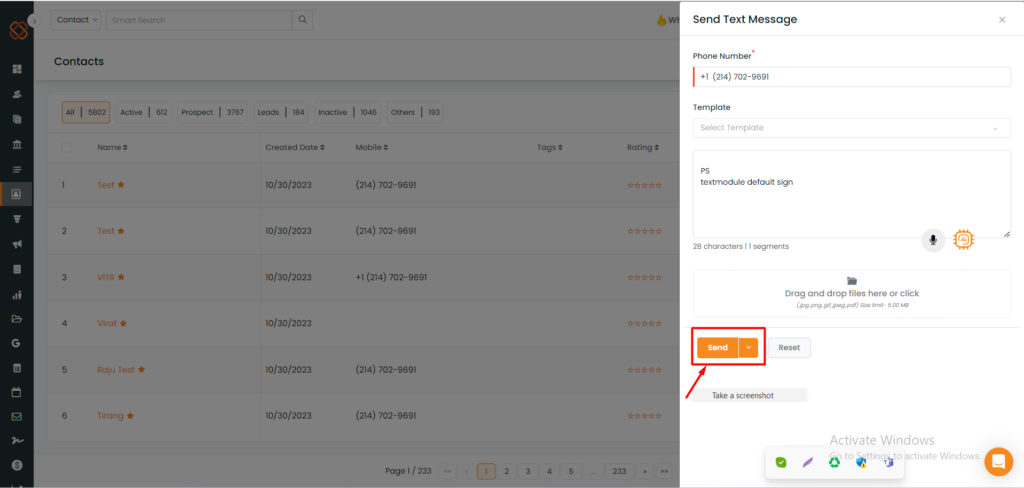
- Send SMS with attachments by selecting a contact, choosing a template or composing a message, attaching files, and clicking Send. View the complete text history with a client in the Contact 360 Past segment.
Add Activity
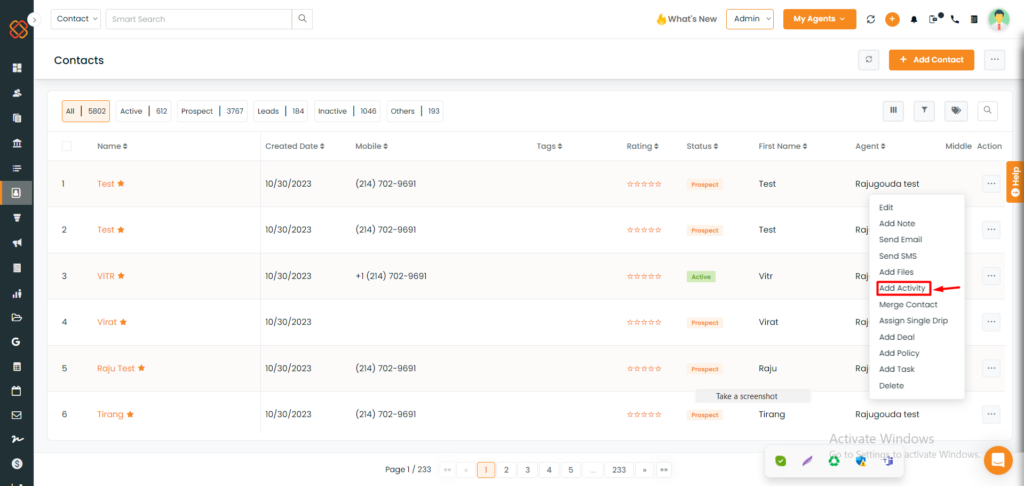
- Click on the “ Add Activity” option of any contact you wish to schedule activity of.
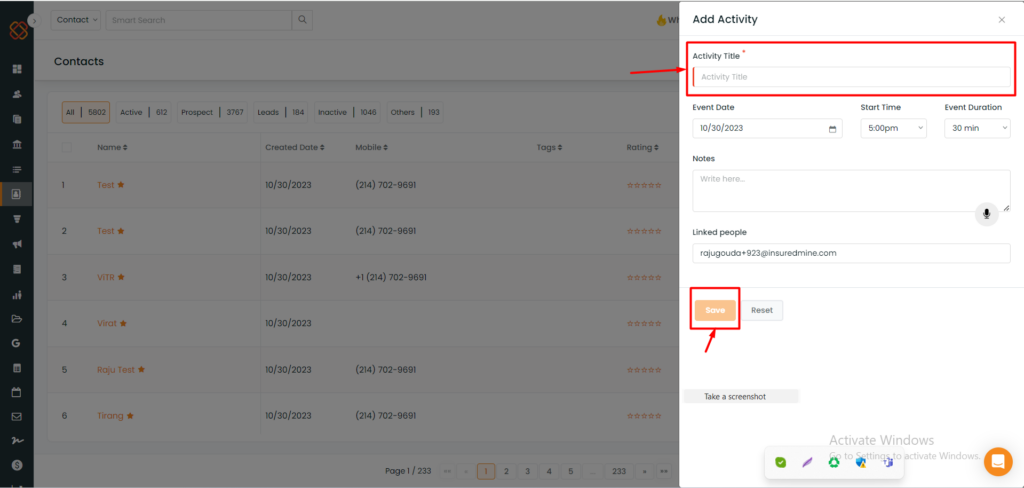
- You can schedule activities in the Contacts module with the activity name, event date, time & duration, and a note. To view past activities, go to Contact name > Events > Past > Activity
Merge Contacts:
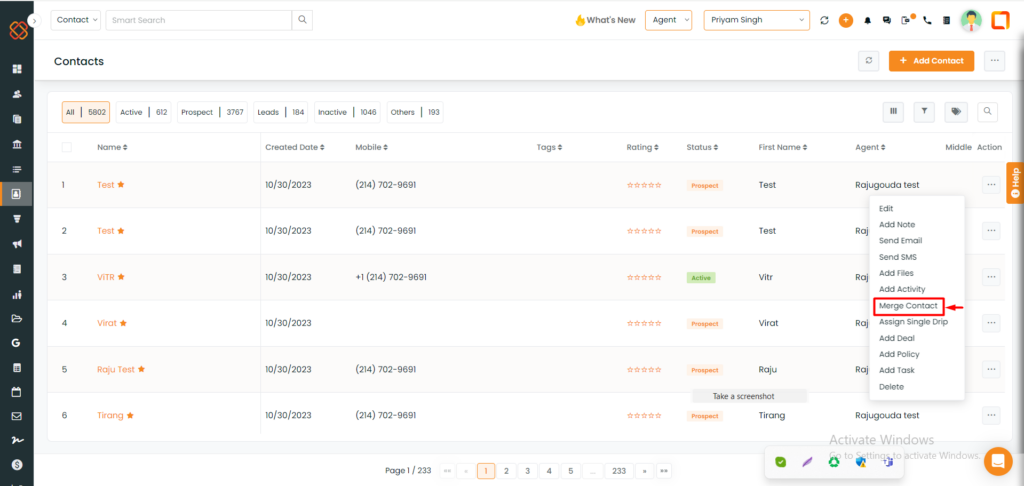
Simplify your record-keeping and improve data accessibility with the Merge Contacts functionality.
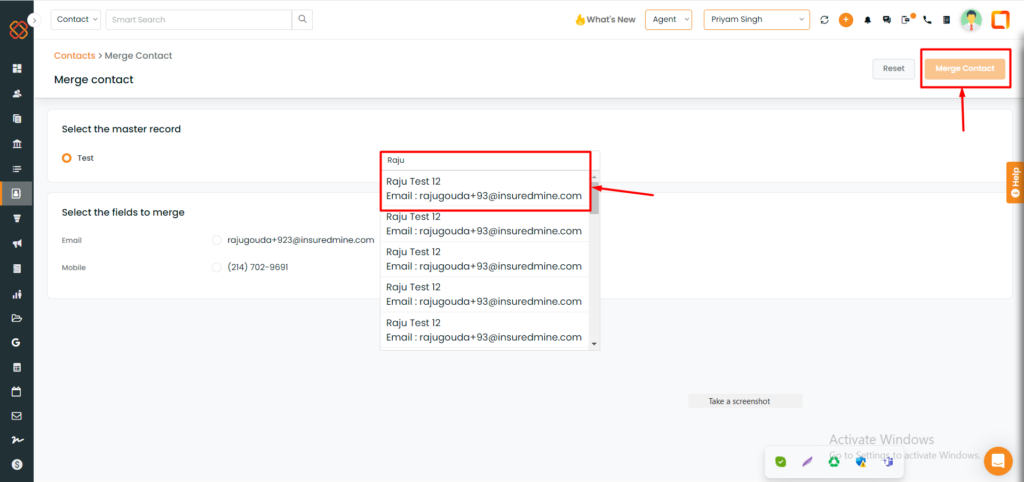
Select the master record. For instance, I have selected Raju Test 12.
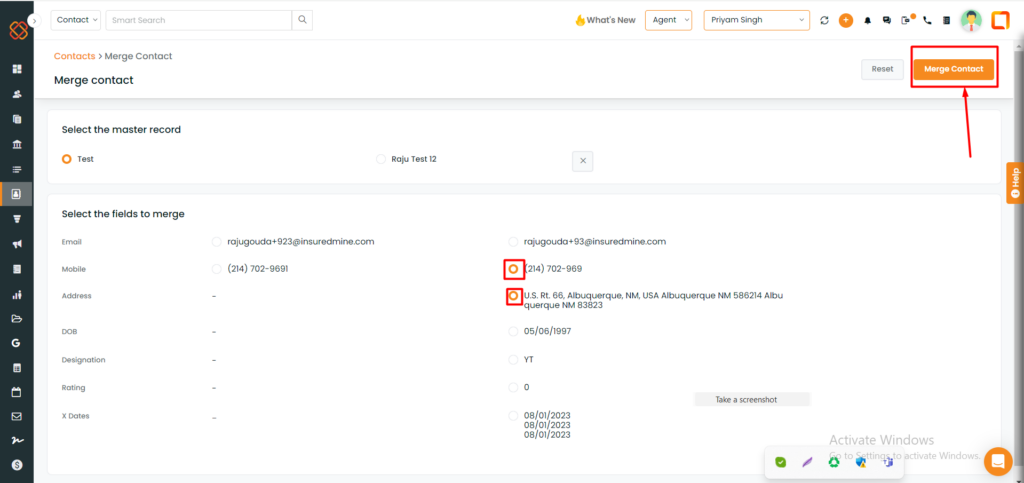
- Then, select the fields to merge.For instance, i have used mobile & adress.
- Click on Merge Contact.
Add Deal:
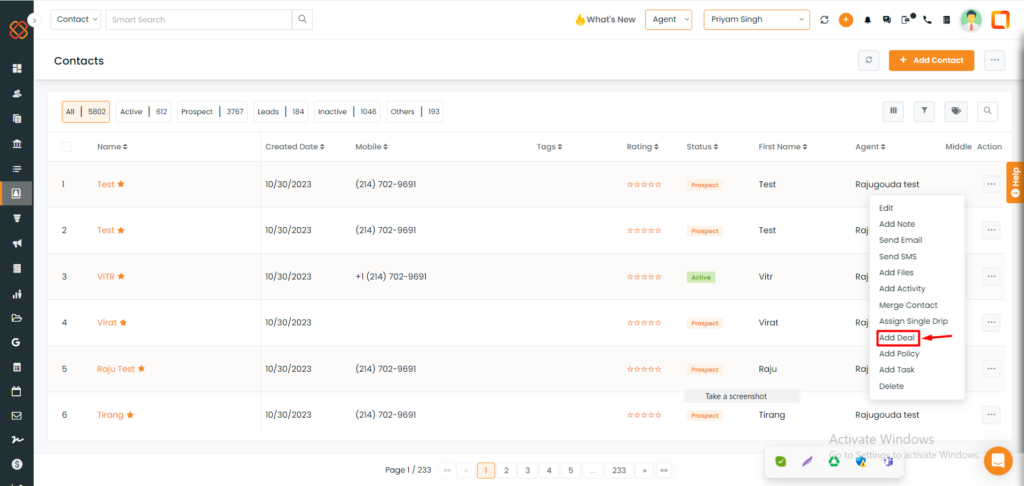
Click on “Add deal.”
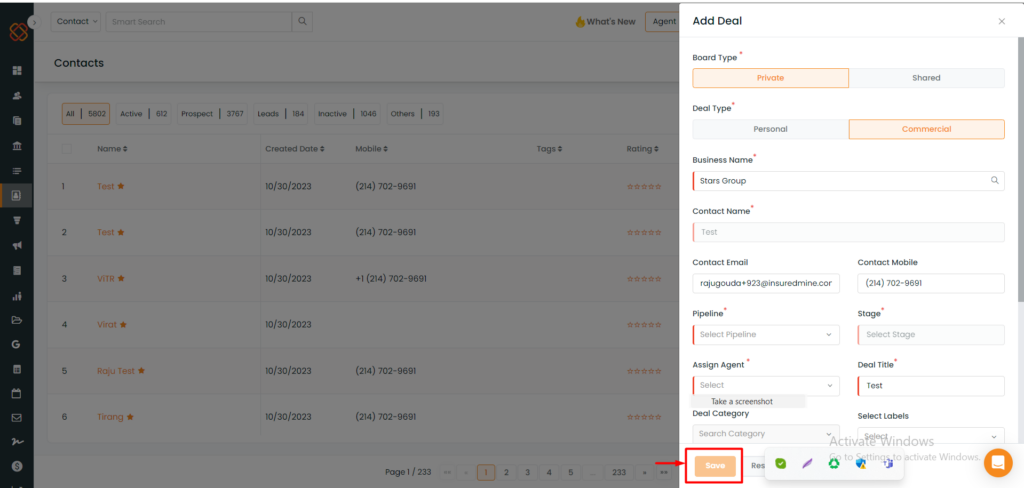
- Accelerate your lead generating process by creating deal or pipeline cards from the “Add deal” window.
Assign Single Drip:
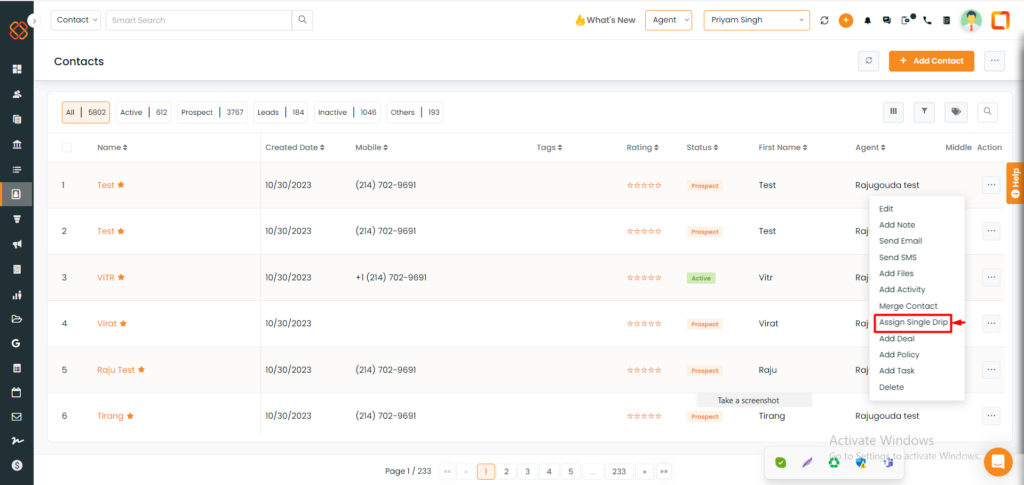
- Click on “Assign Single Drip” to allow users to send multiple emails or tasks to a specific contact or group of contacts.
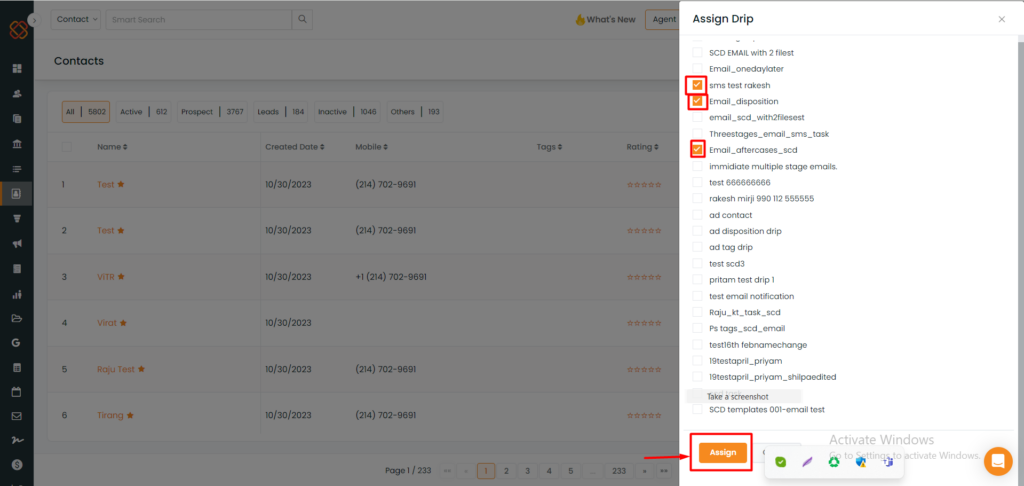
- Select To initiate a drip campaign for chosen contacts, choose the Drip name and click “assign.”
You can also perform seven distinct actions for multiple contacts, such as assigning a drip campaign, deleting contacts, adding tags, deals, ratings, and dates.
Add Policy:
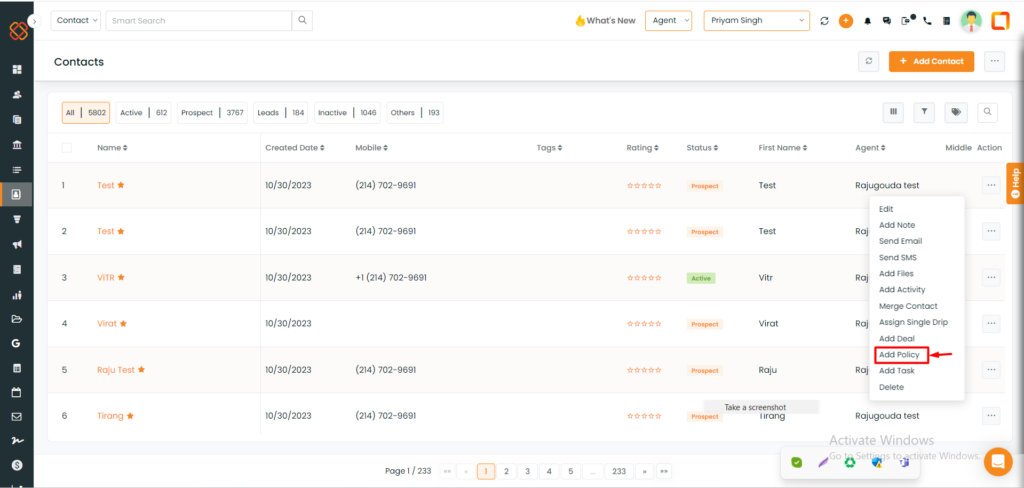
- Click on “Add Policy.” to enter policy information.
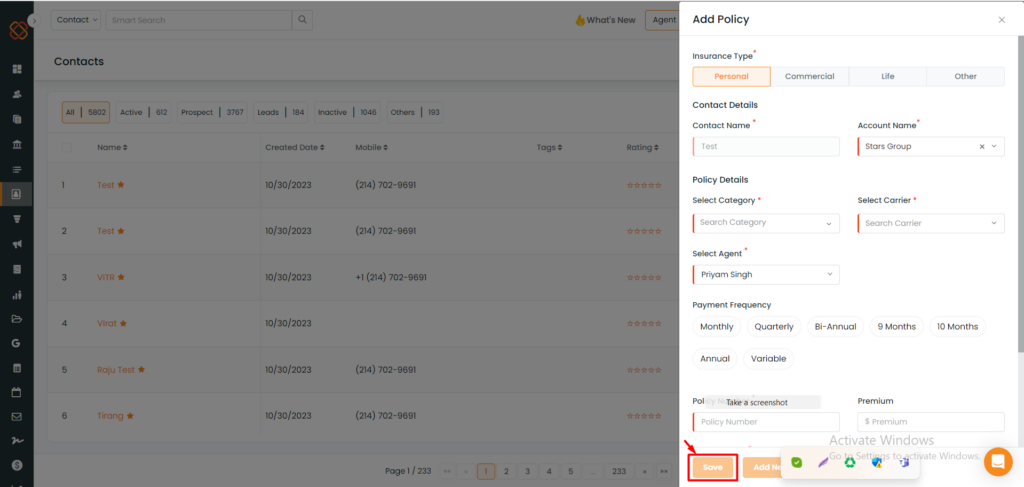
- Fill in the policy details such as Insurance provider, Policy number, payment frequency (monthly, annual, etc.), effective date, expiry date and premium amount.
- Click on Save.
Add Task
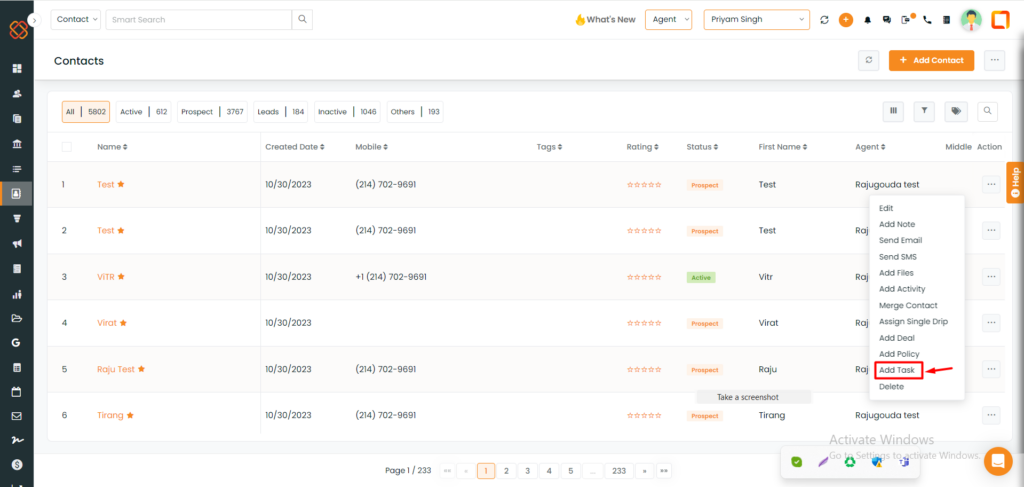
Click on “Add Task” to assign a task to a particular contact.
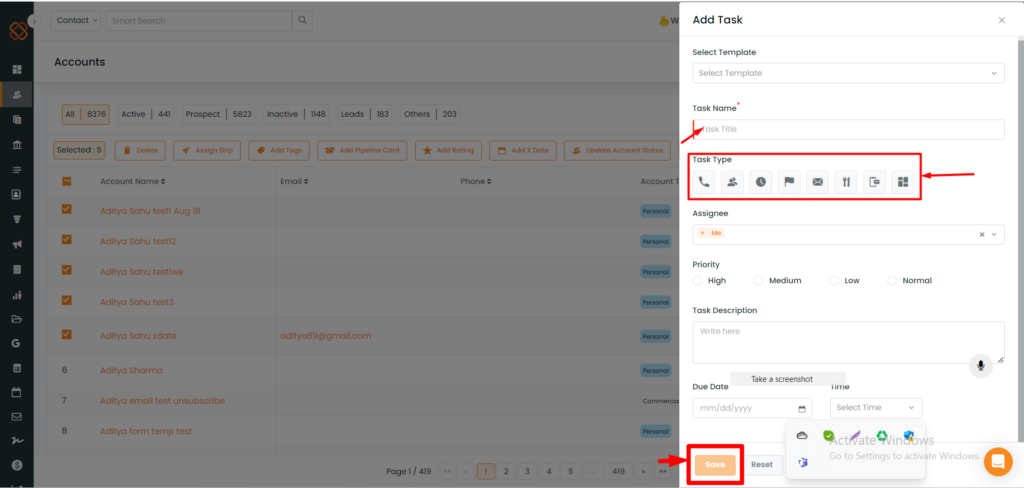
- Fill in the required information for the task, such as task name, task type, contact name, assignee, priority, due date, and task description.
- Click on “Add Attachment” if you want to attach any files to the task.
- Click on “Add to Task Calendar” and then click on “Save” to add the task.
Delete
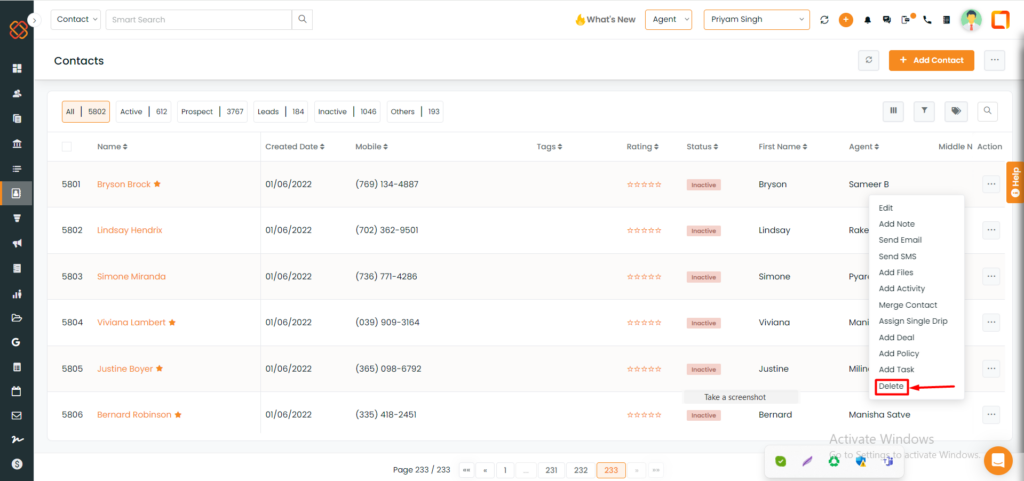
- Click on “delete” if you wish to delete any particular contact.
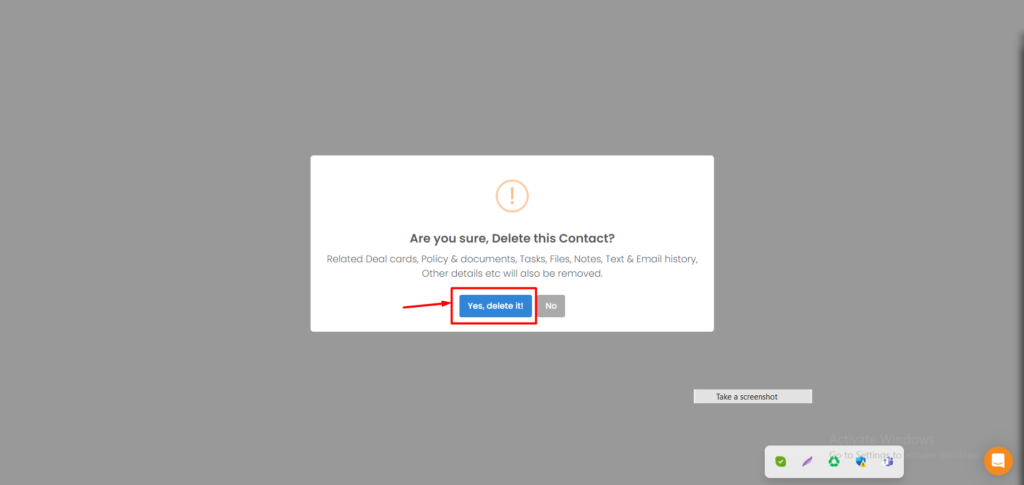
- A warning message will appear saying, Are you sure? Delete this contact.
- Confirm if you want to delete.
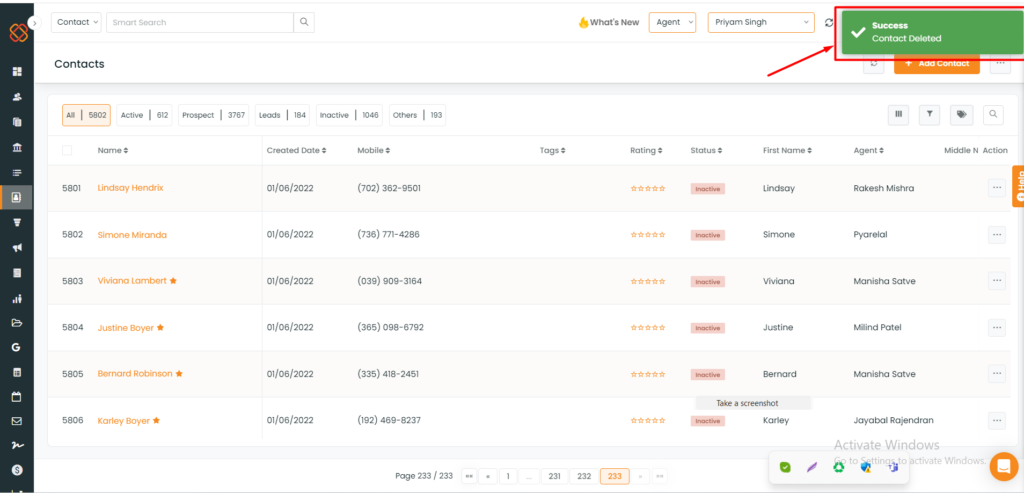
- A notification will pop-up saying: Success Contact Deleted.
How to Add website address of the contact:
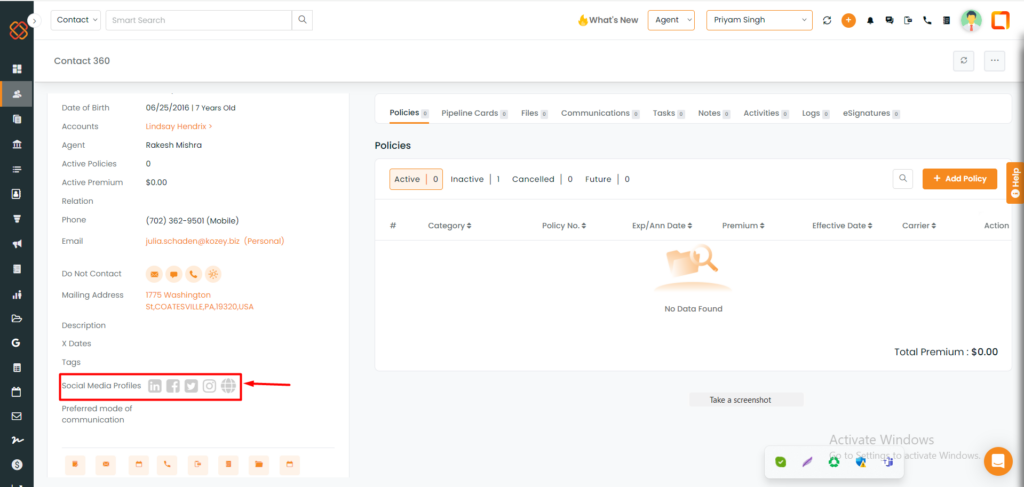
- Go to your Contacts.
- Select a contact to access the Contact 360 view.
- Look for the website icon in the social media profile section.
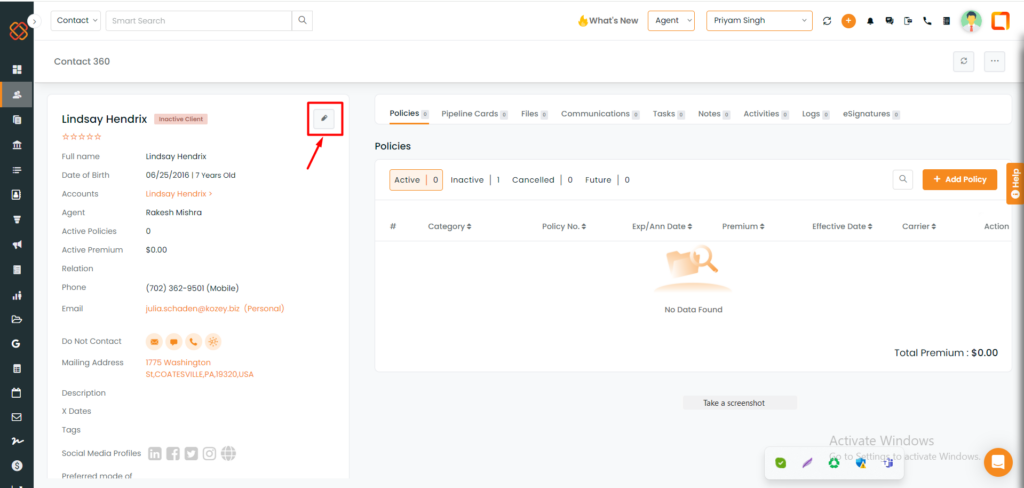
- Click the edit icon within the Contact 360 section to make any necessary changes.
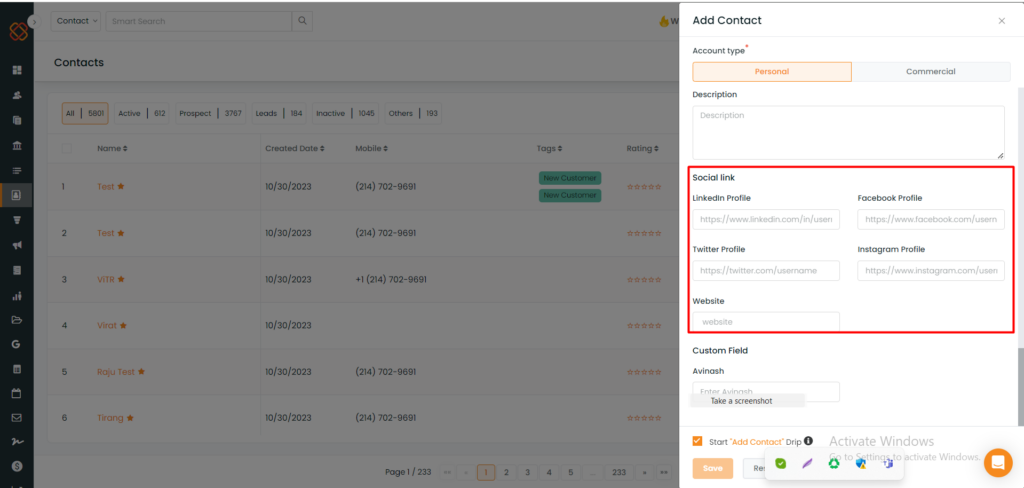
- You can also find the option in the “Add New Contact” section, to include the website name, providing you with an enhanced user experience.
How to Multiple select and update contact status?
Updating the status of multiple contacts simultaneously is a breeze, streamlining your workflow.
Steps to Update Contact Status:
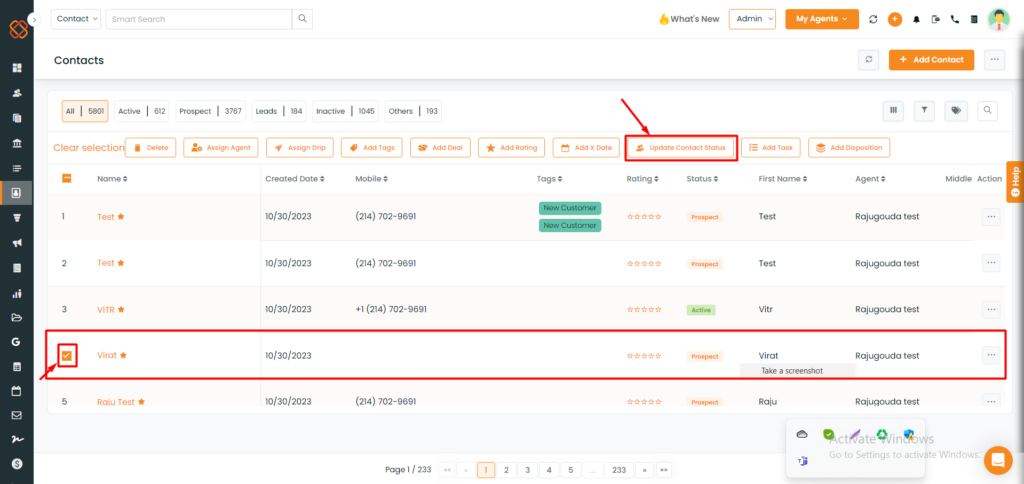
- Go to the Contacts section in the InsuredMine portal.
- Choose the contacts you want to update the status for. You can select multiple contacts.
- Click on Update Contact Status Icon: Look for the “Update Contact Status” icon and click it.
Select Status:
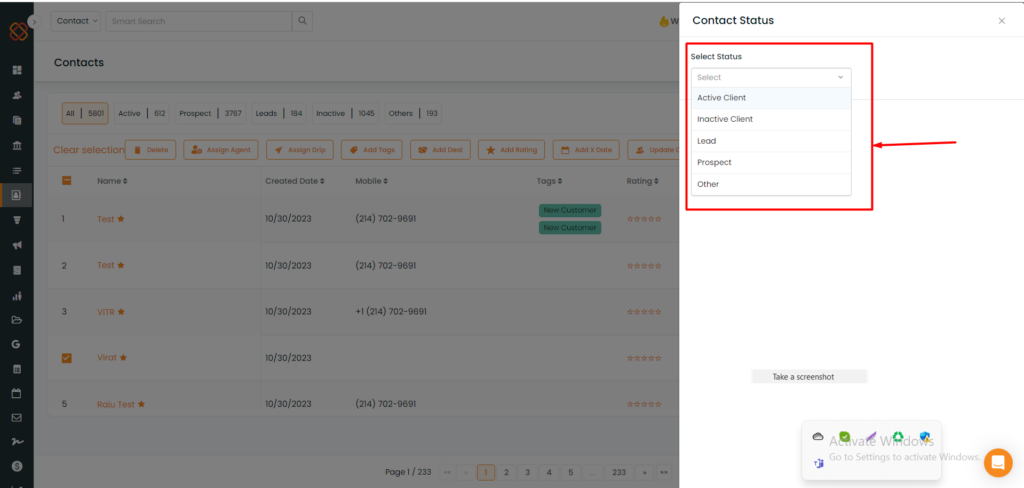
In the popup window that appears, select the desired status from the dropdown menu.
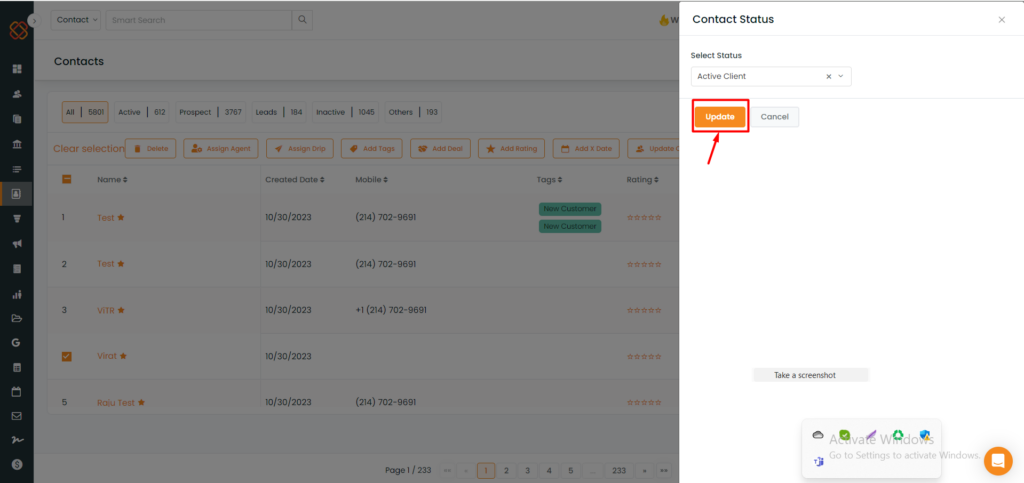
- Click on the “Update” button to apply the status changes to the selected contacts.
Task Management for Multiple Contacts
You can also add tasks for multiple contacts simultaneously, saving time and streamlining your task management process.
Steps to Add multiple tasks:
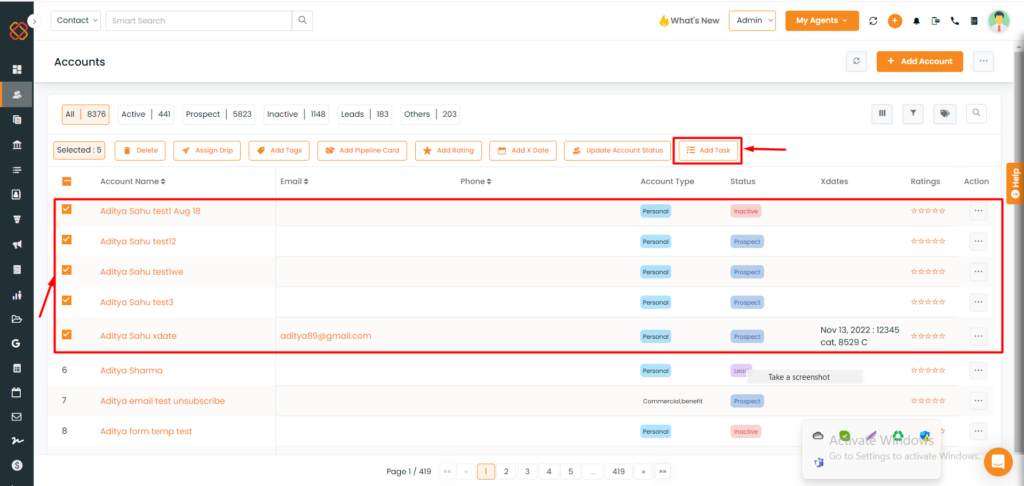
- Go to the Contacts section.
- Choose the contacts for whom you want to create tasks. You can select multiple contacts.
- Locate and click the “Add Task” icon.
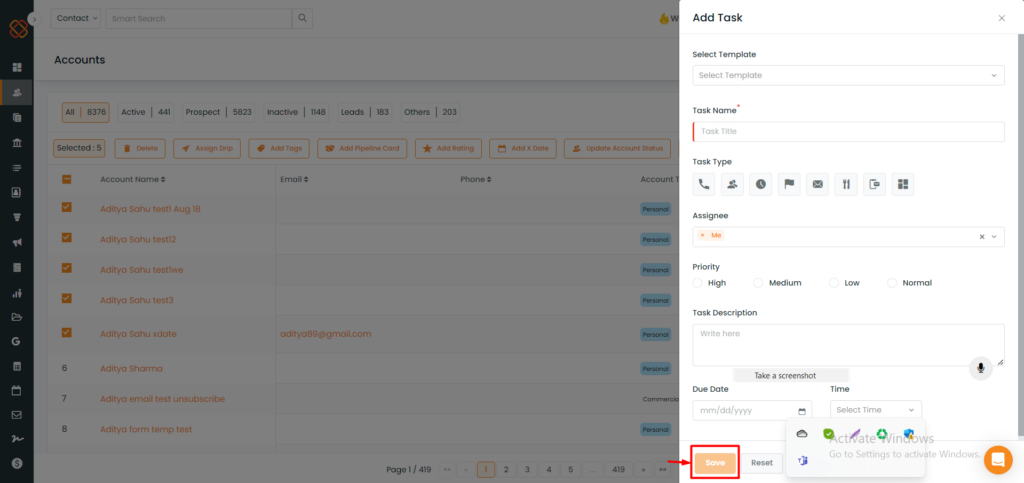
- In the popup window, provide the necessary task details.
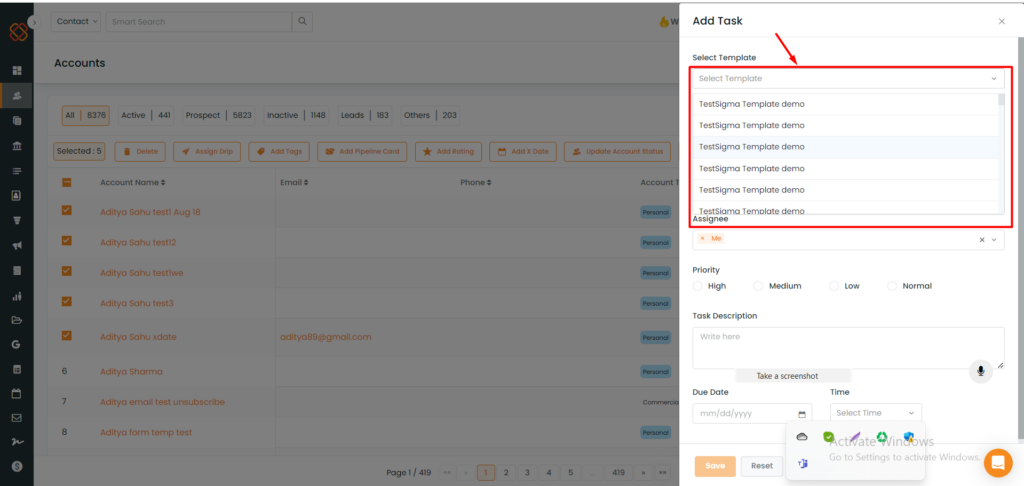
- Select a template (if available).
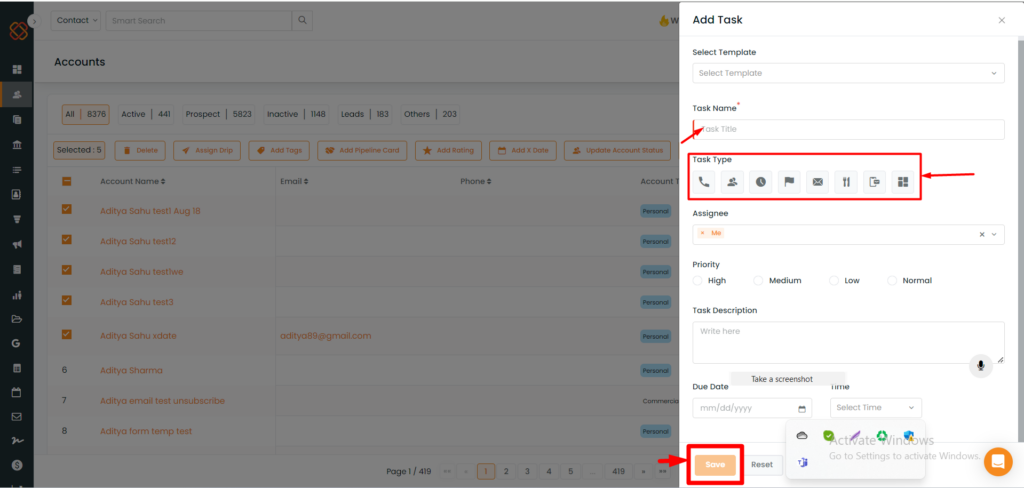
- Enter the task name.
- Choose the task type.
- Set the task’s priority.
- Add a task description.
- Specify the due date and time.
- Save Task: Click the “Save” button to create tasks for the selected contacts.
Contact Update Details - Timeline
Any updates made to contact information via the contact update form sent through email will be logged in the Contact 360 section. This enhancement improves the visibility of contact updates.
Steps to View Contact Update Timeline:
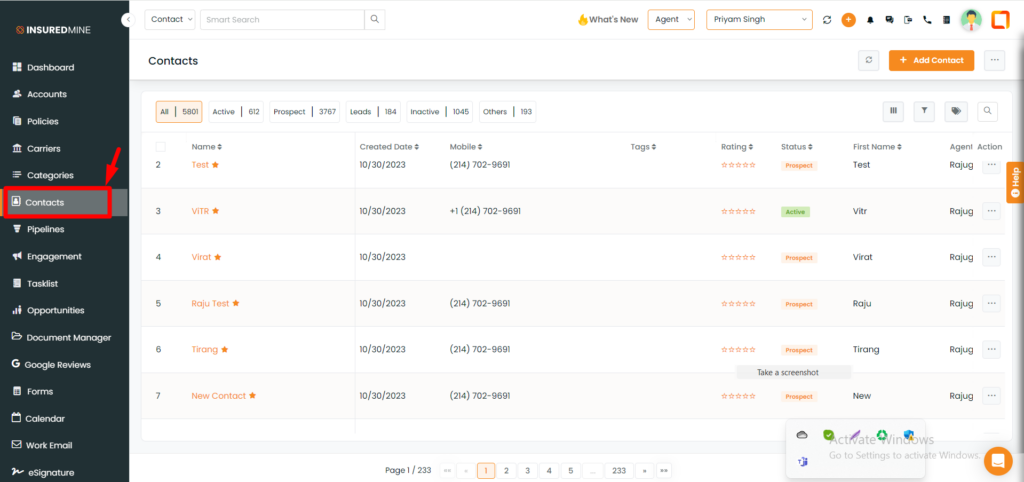
- Access the Contacts module.
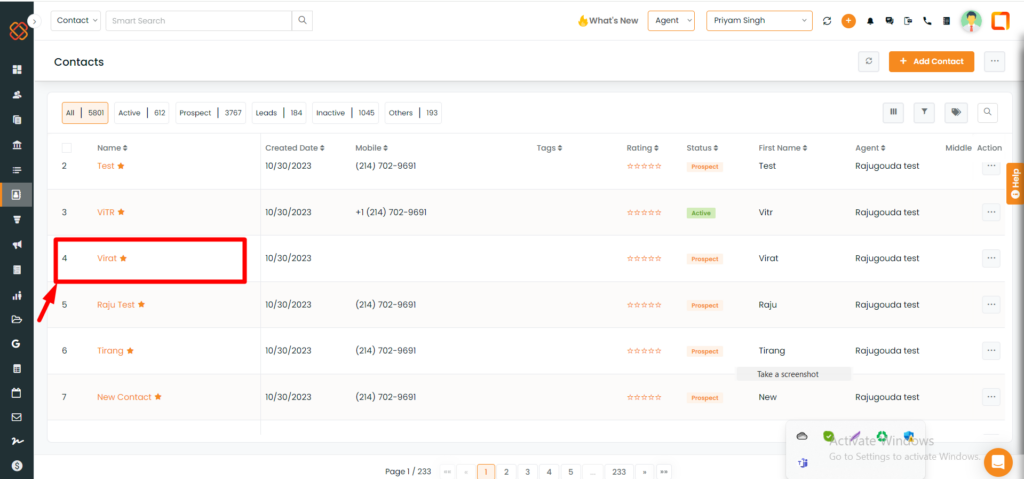
- Select Contact: Choose a specific contact for which you want to view update details.
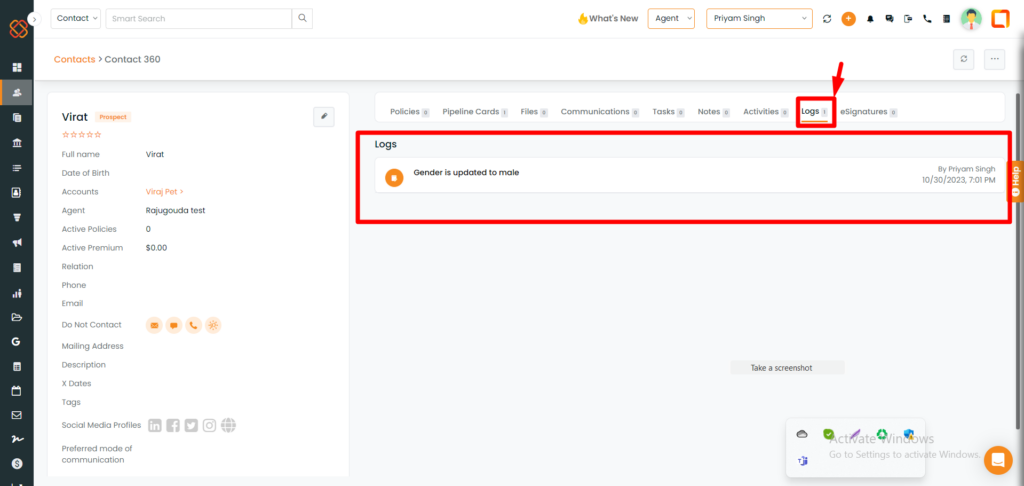
- Within the Timeline View of the “Contact 360” section, the timeline will showcase the most recent updates and logs related to the contact, providing a comprehensive record of their recent activities and interactions.
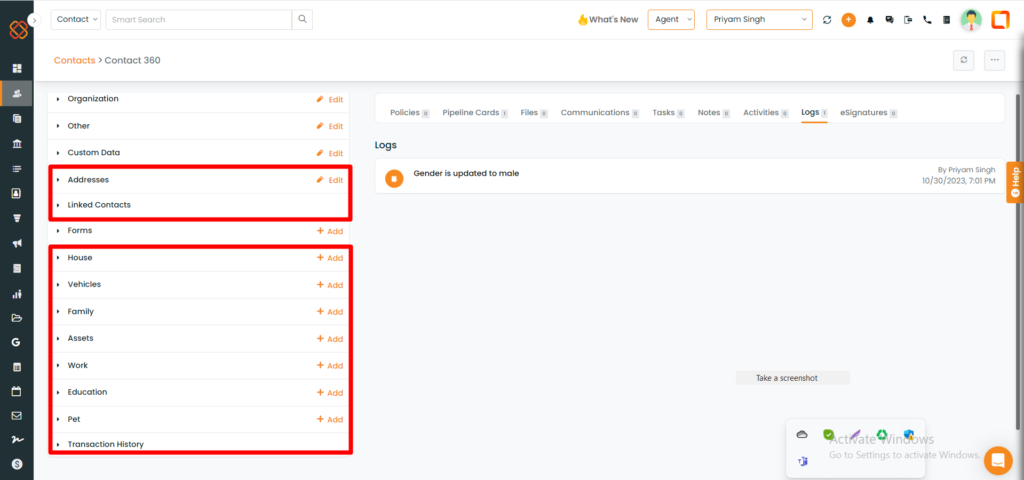
View Updated Data: The updated personal and contact data will be available in the left panel for easy reference.
How to Adjust Table Columns?
Customize the table view to suit your preferences by adjusting and reordering columns as needed.
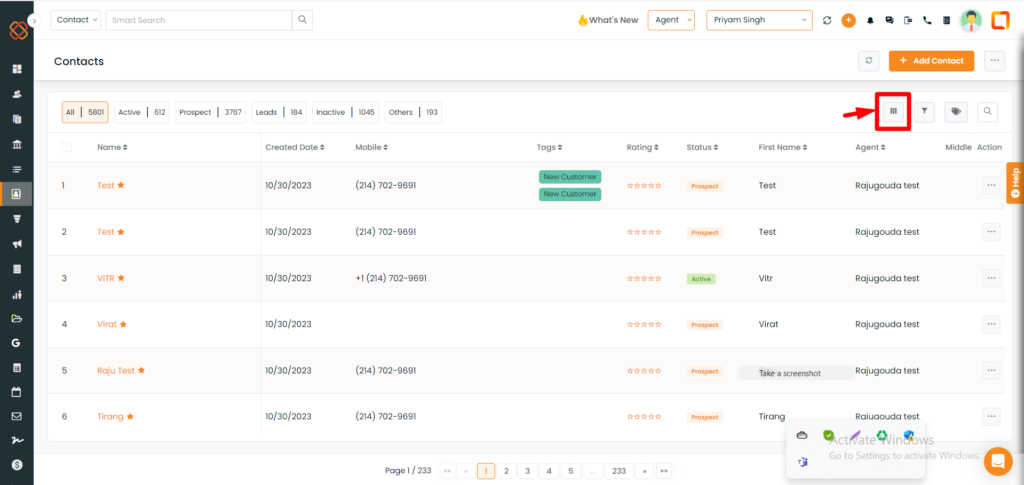
Steps to Adjust Table Columns:
Visit the Contacts section and Choose the “Table Column” view.
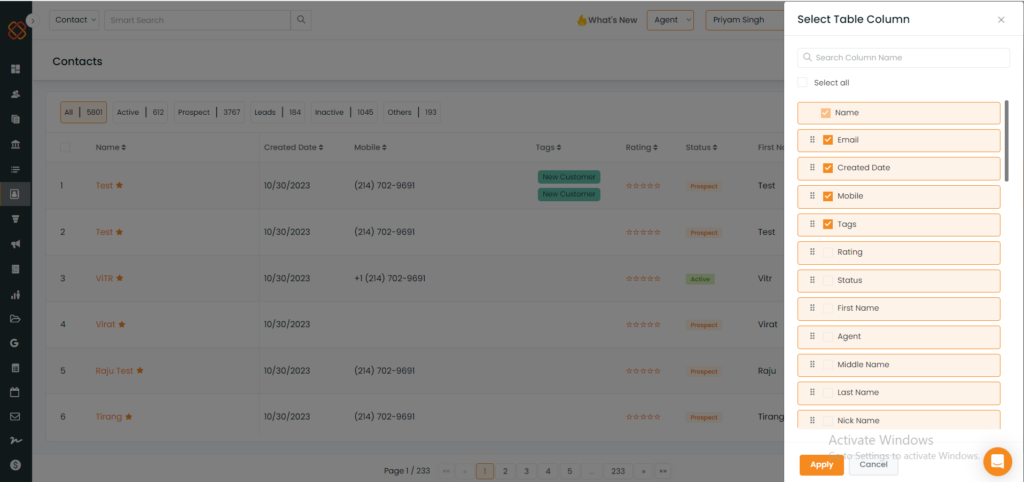
- Customize your table view by handpicking the columns you wish to see, then rearrange them to your liking through simple drag-and-drop actions by clicking “apply.”
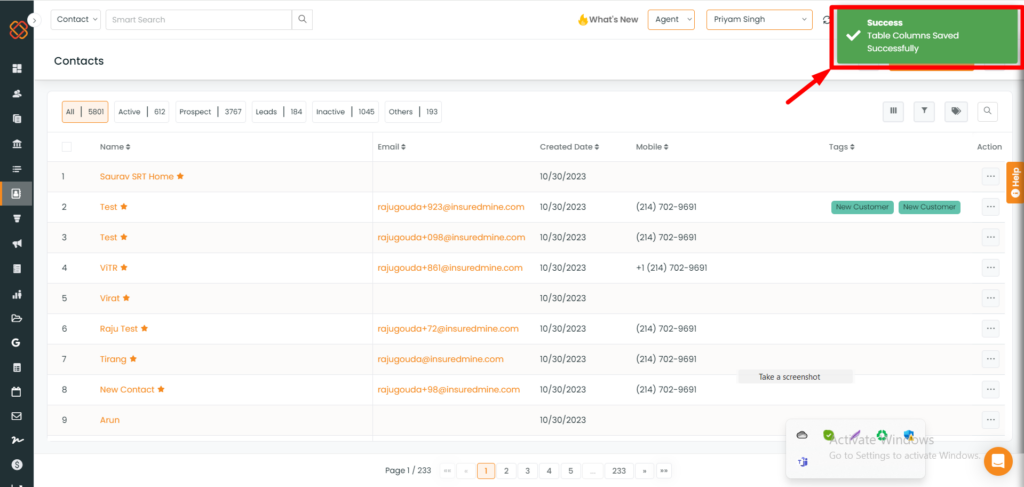
- Upon rearranging the columns, you’ll receive a notification confirming that your table columns have been saved successfully.


